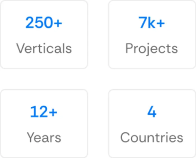
150+ minds across 4 countries. Join a culture of innovation, ownership & growth.
Rewire for AI
From machine learning to deep learning, from classification tools to overall process automation – our AI engineers will help you retool your existing system or enhance your company results.
Ship faster, scale smarter, built for product companies and SaaS teams
Our Latest Work
We strive hard to deliver result-driven digital solutions across the globe. Check out our case studies to get a glimpse of how we ideate, innovate, and create unconventional digital solutions according to the requirements of our clients.
Discover diverse and passionate insights from our tech enthusiasts. We collaborate across various sectors to streamline operations and drive innovation. Explore our rapidly growing collection of articles to see why we’re at the forefront of IT solutions.
The decision to move from Magento to Shopify is one of the most significant replatforming choices an ecommerce business can make. Magento is powerful, but its power comes with...
Accuracy gap is real: Traditional CPG forecasting carries a 25-40% MAPE error rate. AI-powered models bring that down to 8-15%, according to McKinsey research....
Hubspot provides a best-in-class customer experience connecting everything a scaling company needs to deliver into one place. Hubspot is a Customer Relationship Management Platform (CRM) that bestows tools and solutions for sales, marketing, and customer services. This platform aims at helping businesses grow manifold by providing a comprehensive approach to attracting, engaging, and delighting customers. As a business, you can manage all your customer interactions in one place, gain insights into customer behavior and customize your marketing efforts.
Apart from the above-mentioned services, Hubspot also offers a birthday field to its users. It is a property in Hubspot that stores the date of birth of a contact. The birthday field can be added to a contact’s profile and can be used to personalize market efforts such as sending birthday greetings or special offers on a customer’s birthday. This information can be used for segmentation and personalization in your marketing campaigns.
This blog will help you in how to add a birthday field to Hubspot. So, we commence learning something new to impress your customers furthermore so as to attract more and more business and crack more deals. Let’s begin.
How To Add Birthday Field To HubSpot – 2 Best Methods
Here, in this section, we will be showing you the guide on various methods to add birthday field to HubSpot. The two tested, simple, and most used methods are to use a HubSpot Property and to use a custom field. We have tried our best to describe it in the most genuine way along with the screenshots at every step from the HubSpot portal(although it keeps updating).
If you want to skip the reading and directly watch the steps illustrating both the methods to add birthday field to HubSpot, then watch this video tutorial below (otherwise continue reading!) :
How to Add Birthday Field To HubSpot? (Best Way) – Tutorial by APPWRK IT Solutions
Method1: Use A HubSpot Property
Steps to add a birthday field to HubSpot using a HubSpot property are illustrated below:
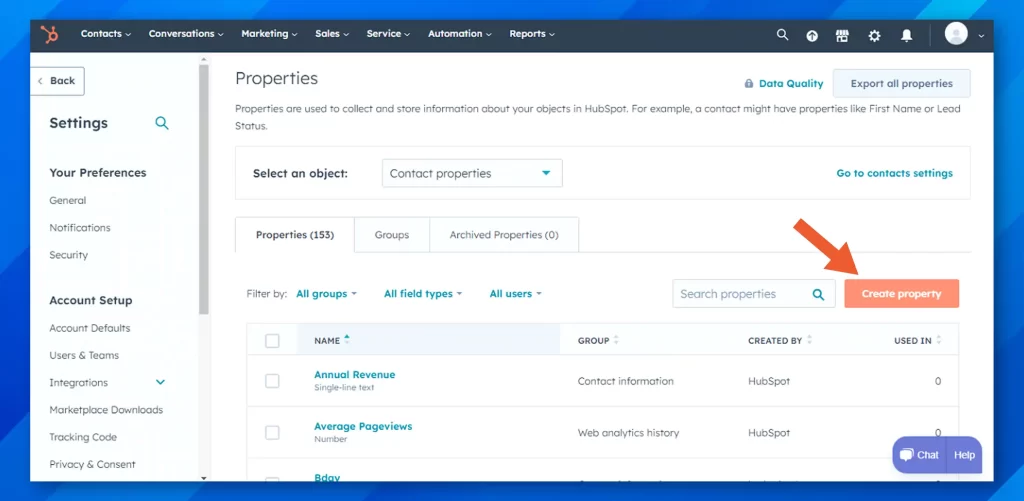
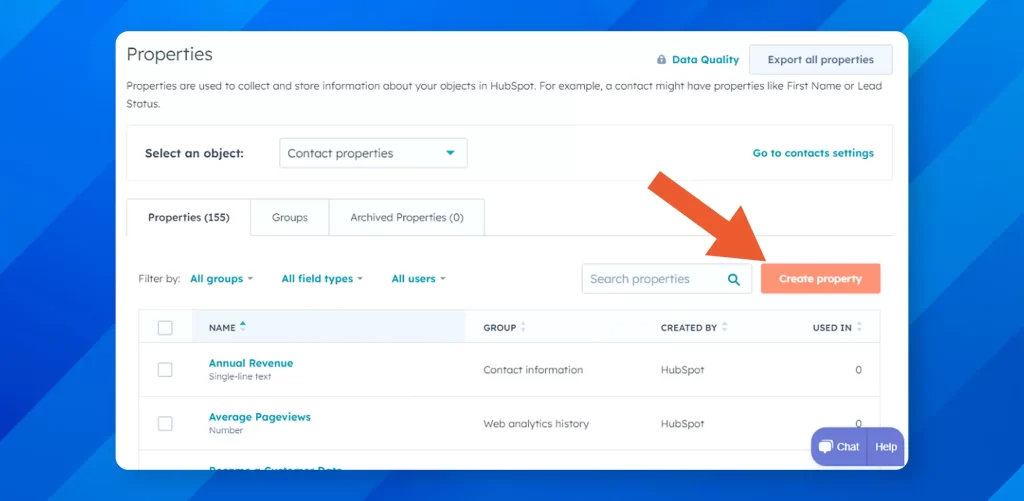
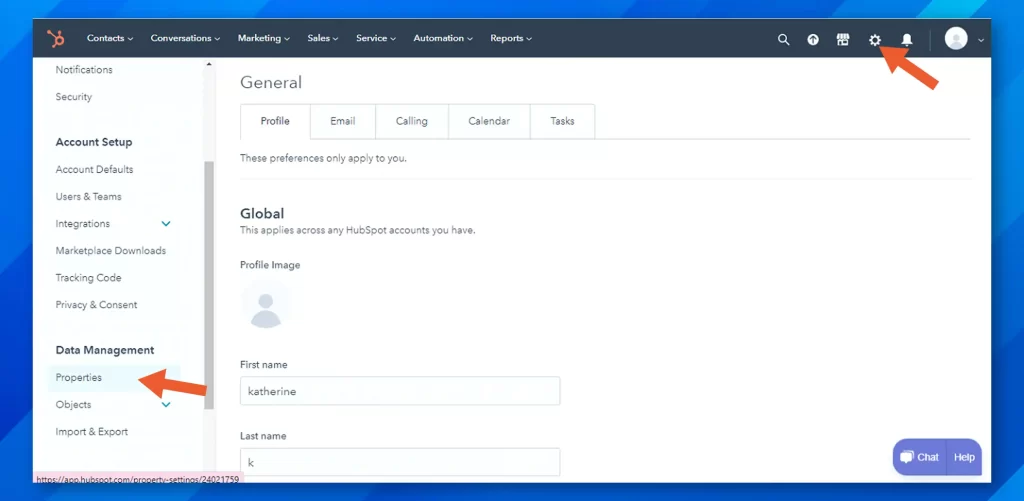
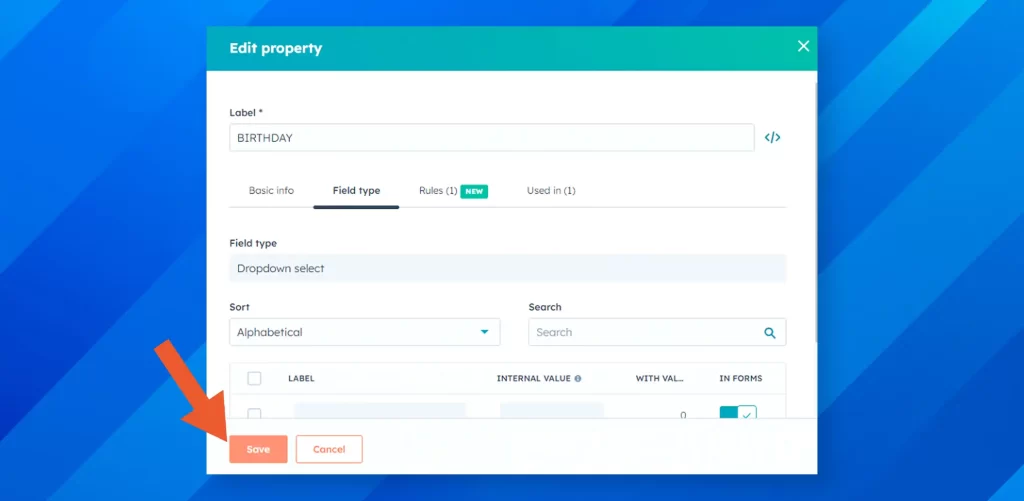
Step#1: Login/Sign in to your HubSpot account and navigate to Settings and then to Properties situated at the bottom left of the dashboard.
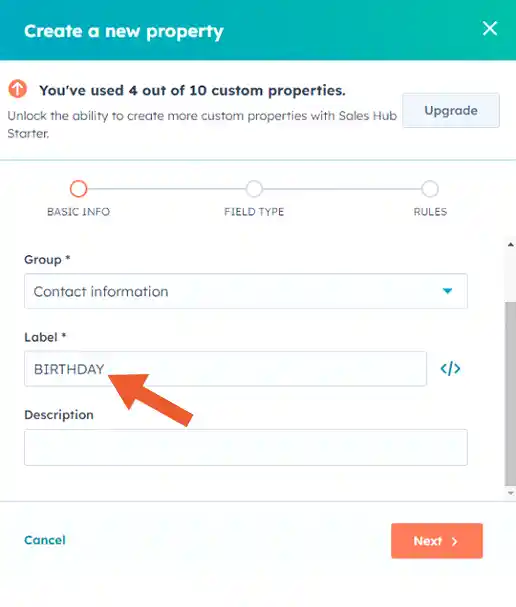
Step#2: Click the Create Property button at the top right of the screen
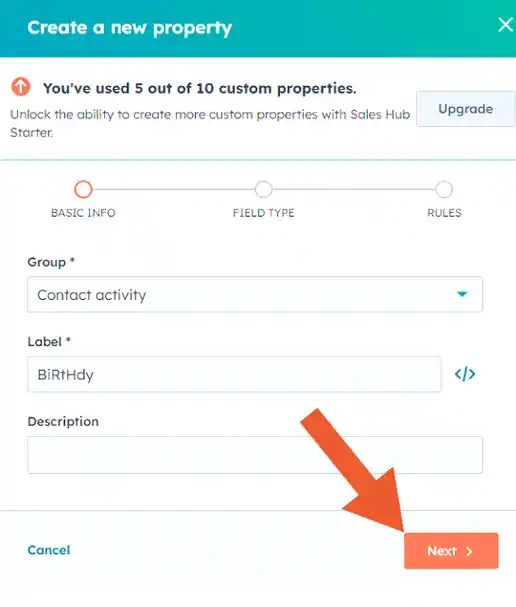
Step#3: Once you click on the Click Property button, a Create property dialogue box will appear on your screen, enter the required information into respective fields like Object Type, Group, and Label and then click Next.
Step#4: After clicking on Next a new dialogue box will open called Create a new property. Choose whether the property should be associated with contacts, companies, deals, or tickets
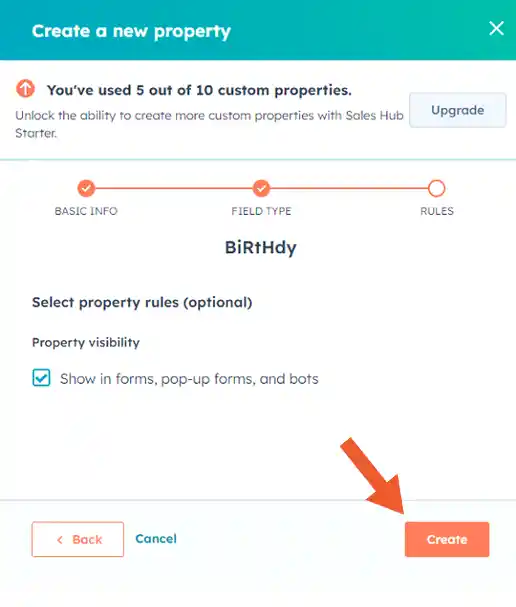
Step#5: Click the Create property button to add the birthday field to your HubSpot account.
Method 2: Use A Custom Field
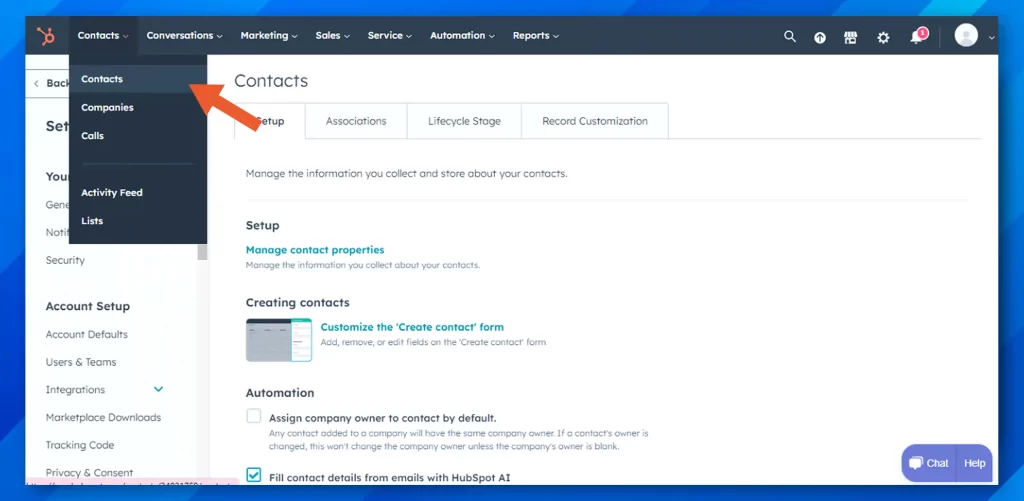
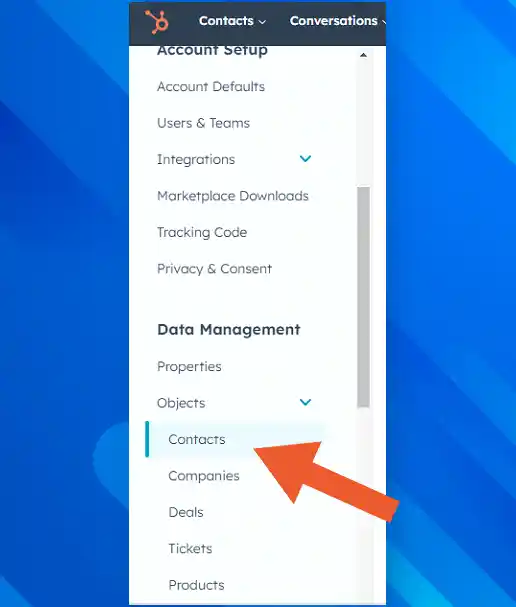
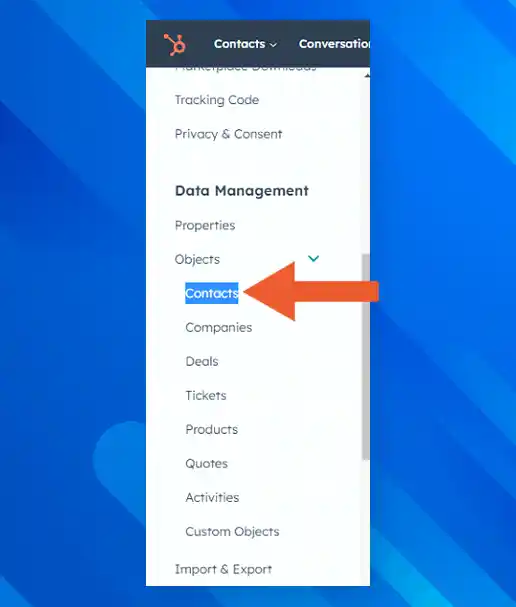
Step#1: Login into your HubSpot account and go to Contacts in the upper left corner of your screen.
Step#2: Click on Contacts and it will guide you to a page of lists.
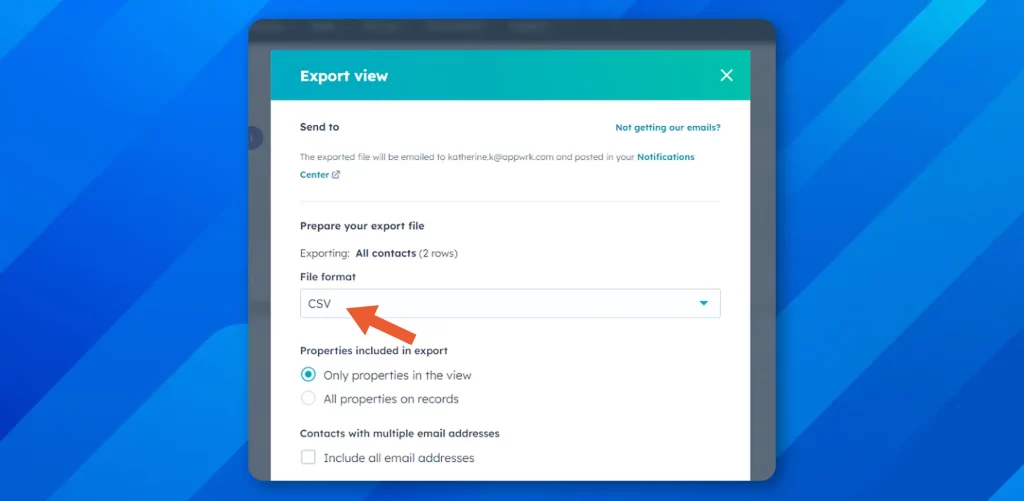
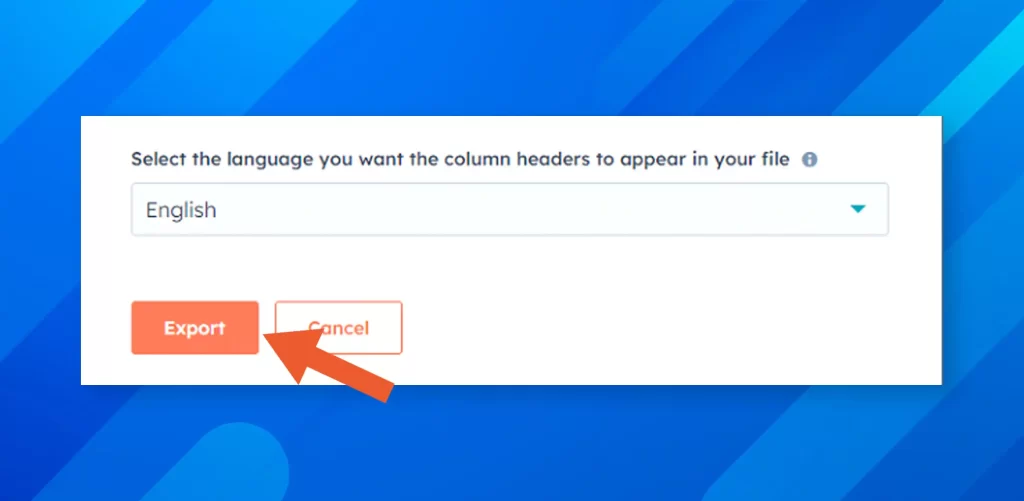
Step#3: On the upper right corner, click Export which will open an Export view window. Select the file format as ‘CSV’ and click Export at the end of the page.
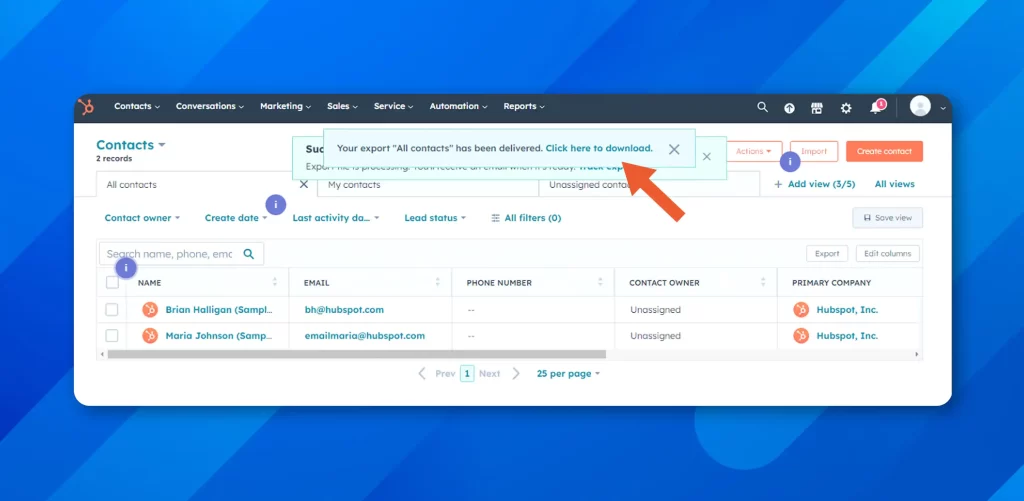
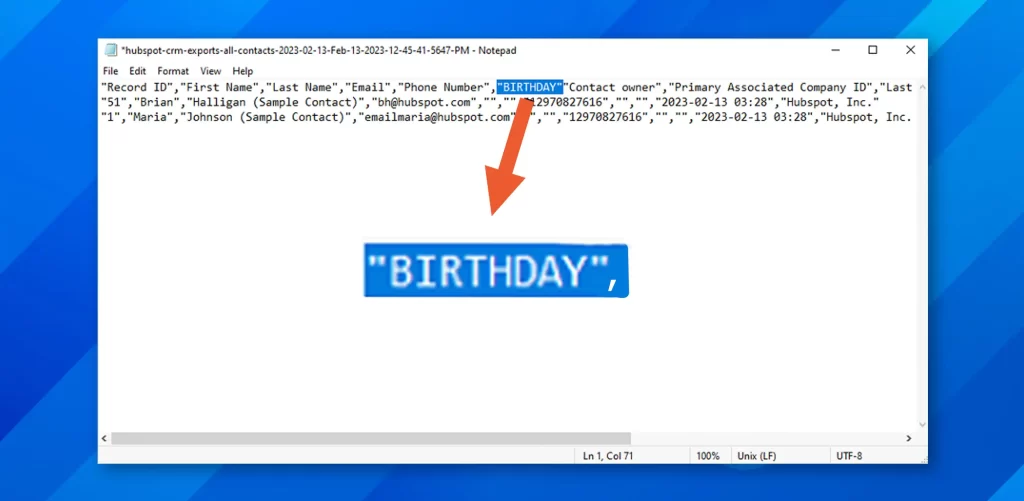
Step 4: Click Click here to download. Once the file is downloaded right-click to open your excel file with Notepad to add a new column called ‘Birthday’.
Step 5: Add a column name i.e. birthday (in this case) to create a new custom field in Notepad with a separator (don’t forget).
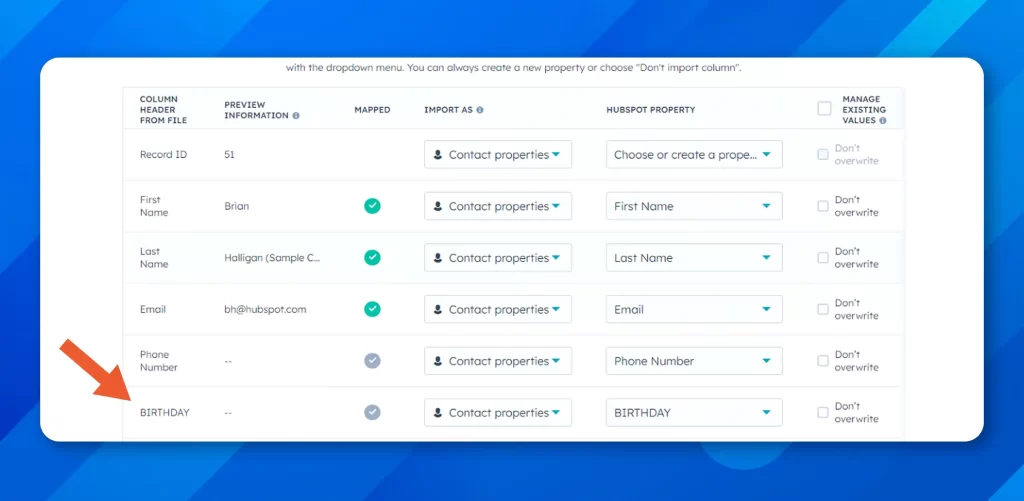
Step 6: Save the changes and import the file after following the instructions.After importing the file a new column ‘Birthday’ will be added to the existing file.
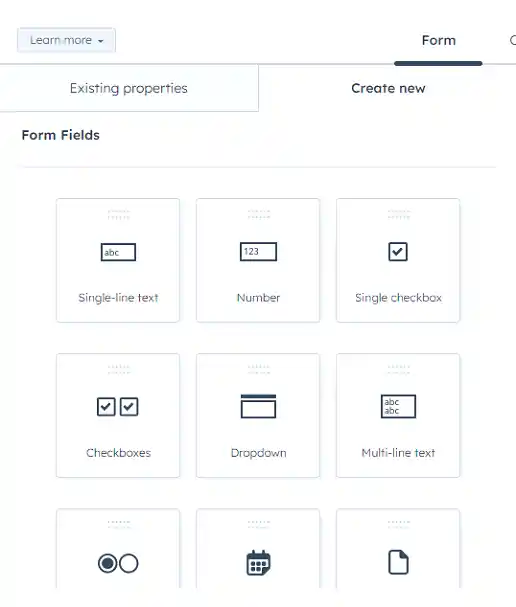
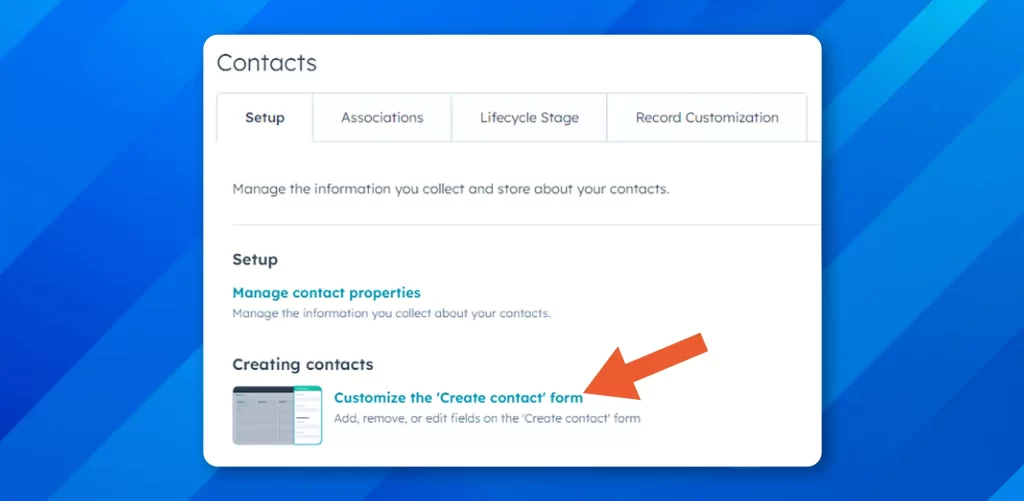
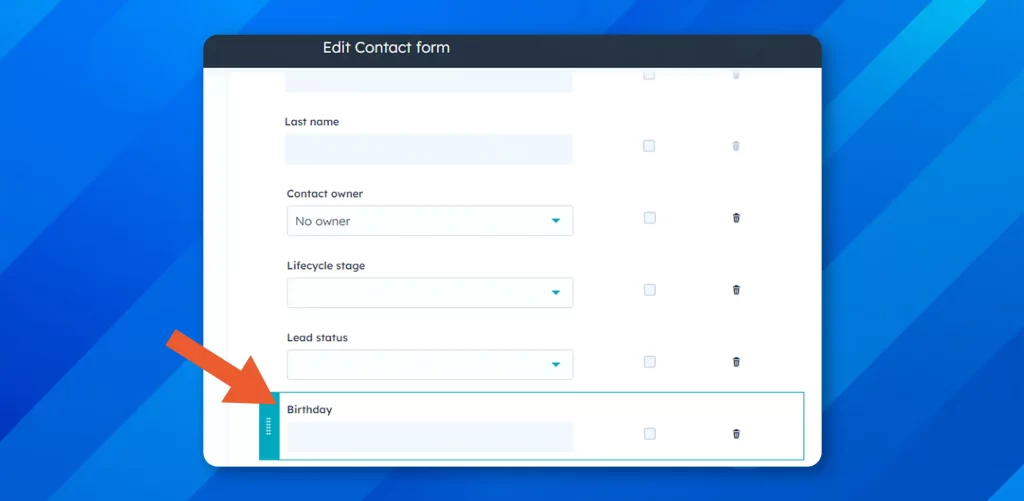
How To Add A Birthday Field To The HubSpot Form
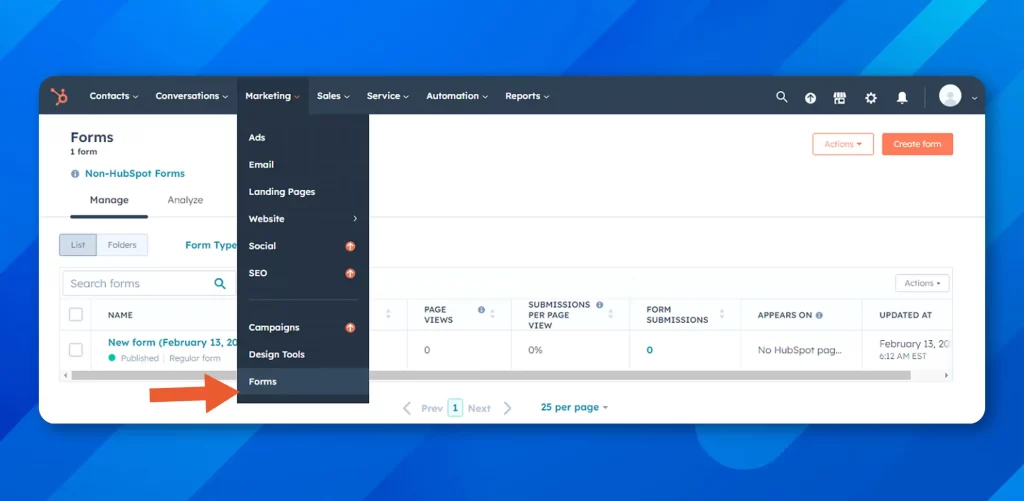
Step 1: Navigate to the forms section of your HubSpot account
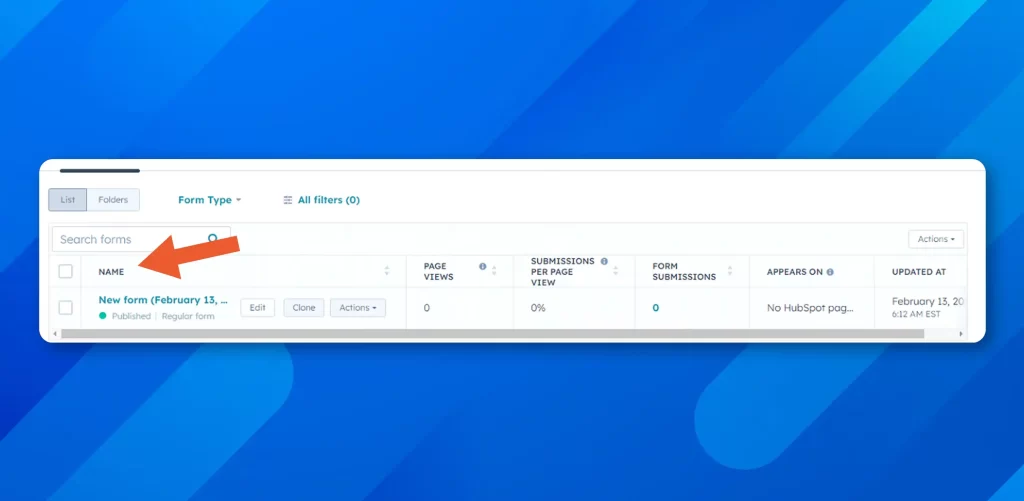
Step 2: Click the name of the form you want to edit
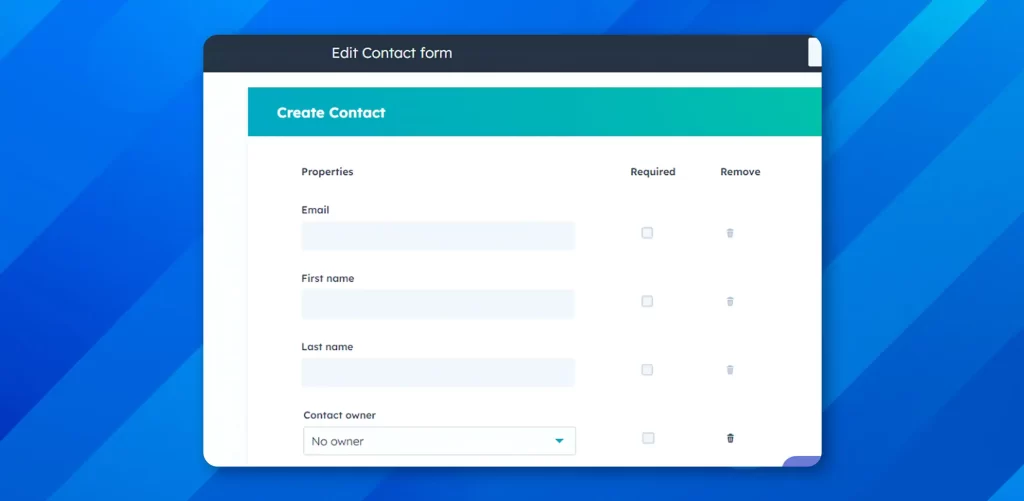
Step 3: Select the fields tab from the sidebar
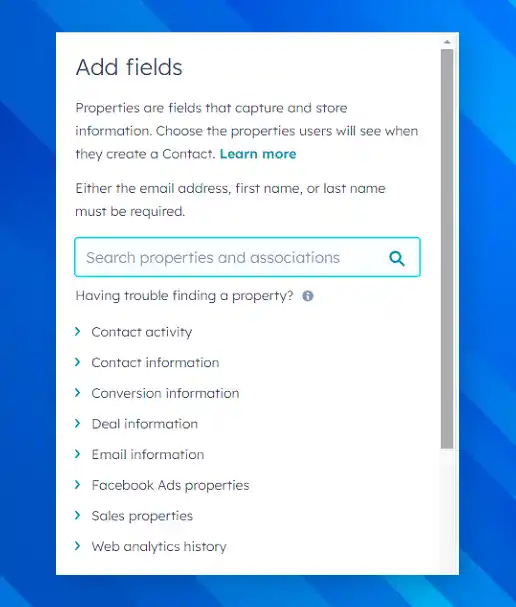
Step 4: Click the [+] Add field button and select birthday from the dropdown
Step 5: Configure the setting and click the save button
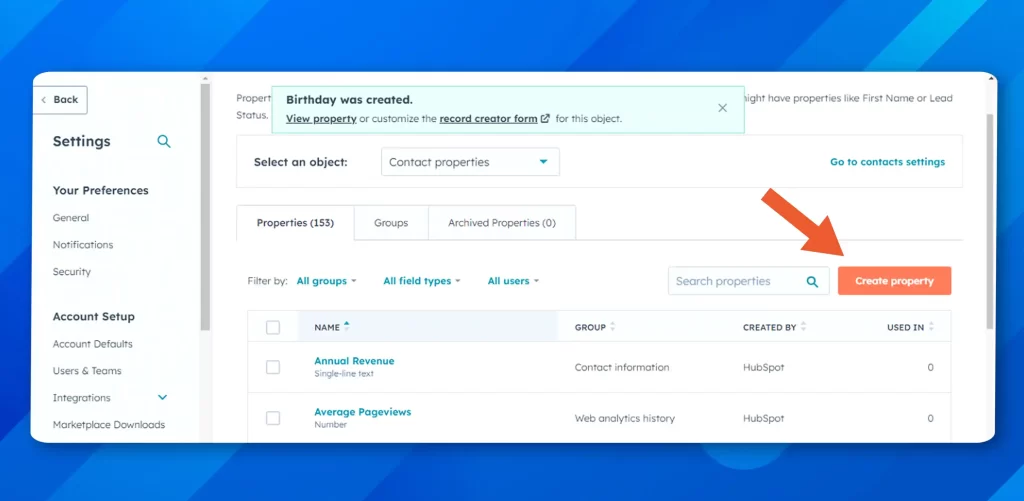
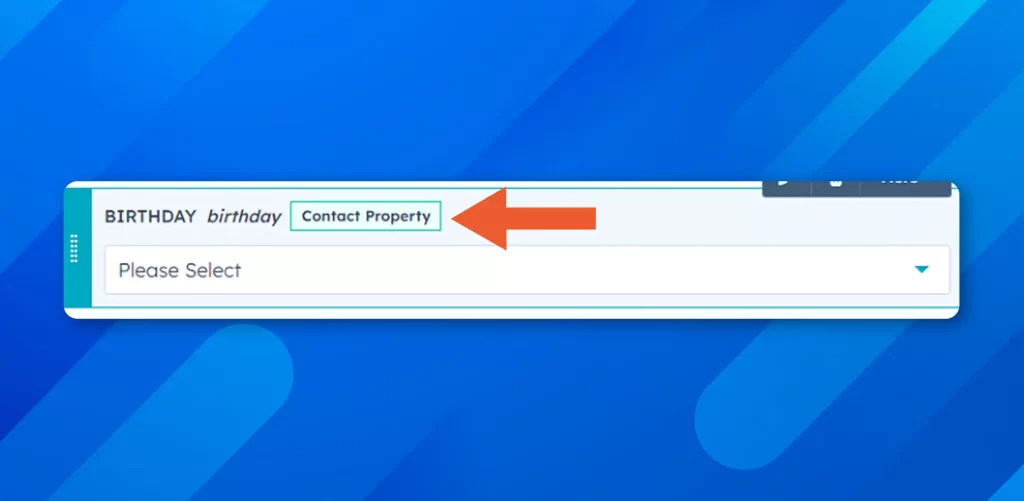
The birthday field has been successfully created as is clear in the screenshots.
How To Access And Update The Birthday Field In The Form Builder
You can access and update the birthday field in the form builder after following the steps described below:
Step 1: Log in to your Hubspot account
Step 2: Click the Hubspot Contact from the sidebar
Step 3: Now click the form button
Step 4: Select the form you want to edit
Step 5: Click the Add Field button in the field section
Step 6: Select Birthday from the dropdown and click the Next button
You can create custom properties for birthdays if you do not use HubSpot’s CRM. Also, you will be able to only add the birthday field on forms that are connected to HubSpot’s contact properties.
How To Create A Date Property In HubSpot
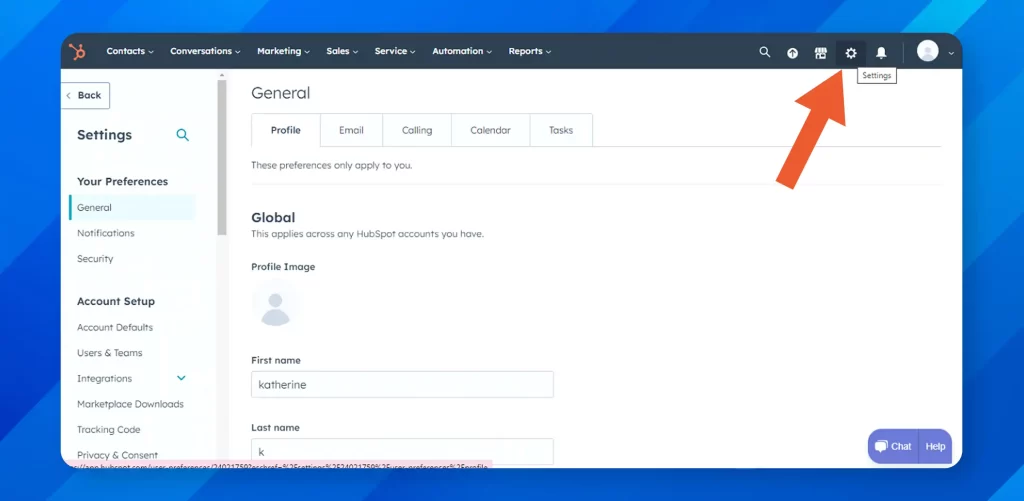
Step 1: Go to your HubSpot account and click the settings icon in the navigation bar.
Step 2: In the left sidebar menu, navigate to properties.
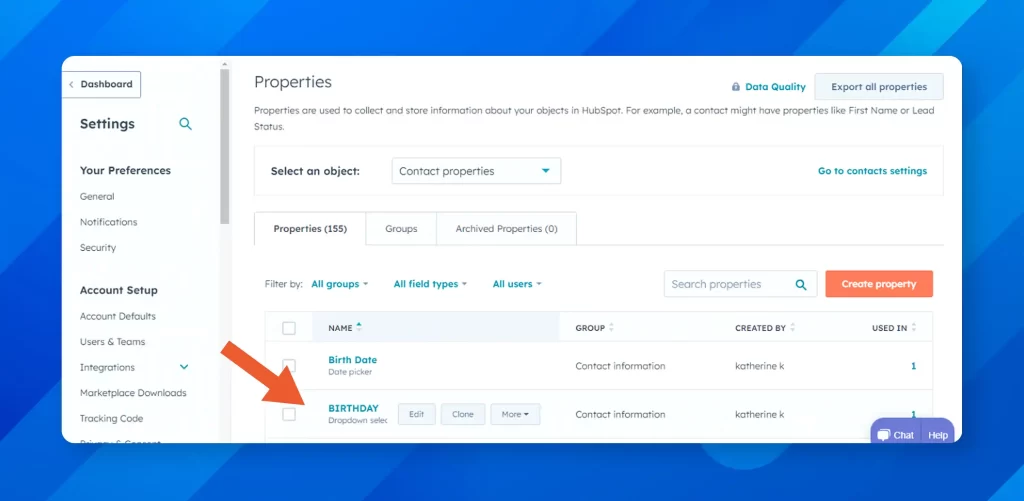
Step 3: Navigate to the Select an object dropdown menu and click Contact Properties.
Step 4: Click Create Property.
Step 5: Fill in the Object type, Group, and label, and click Next.
Step 6: Define the field’s type as a Date picker and click create.
This has successfully created a custom Date Property.
Add A Birthday Field To Default View
HubSpot allows you to customize the fields in the left-side menu. You can add the birthday field as a default view so it is visible every time you open a record.
Step 1: Go to your HubSpot account and click the settings icon in the main navigation bar.
Step 2: In the left sidebar menu, navigate to Object Contacts.
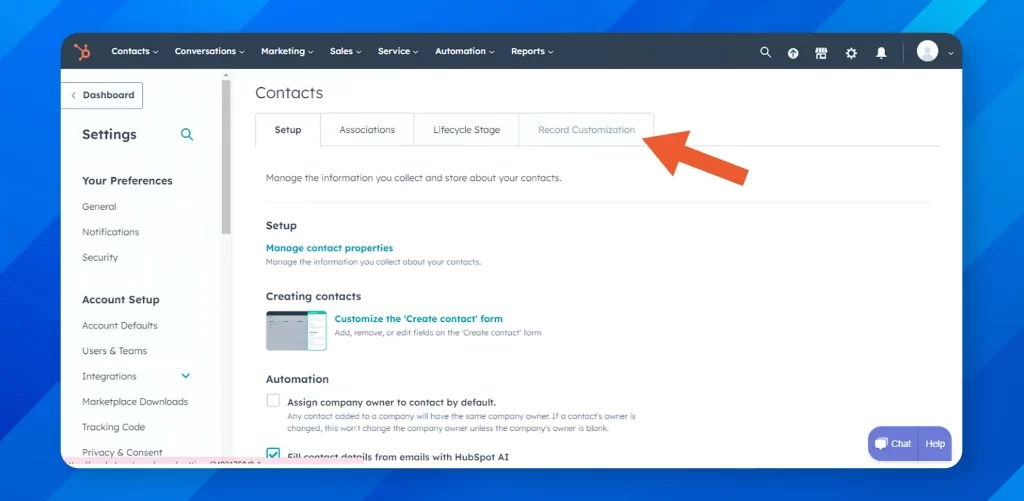
Step 3: Hover to the Record Customization tab, choose properties for the default sidebar and then click Edit.
Step 4: Use the Search bar to look for the birthday field.
Step 5: If necessary, change its position within the section and click save.
Final Thoughts – How To Add Birthday Field To HubSpot?
As discussed and illustrated above, there are many methods to add a birthday field to HubSpot but please feel free to mention which one did you like the most and why? Also, if you are aware of any more methods to add birthday field, drop us a message by contacting APPWRK anytime so that we can improve further.
Gourav Khanna is the Co-founder and CEO of APPWRK, leading the company’s vision to deliver AI-first, scalable digital solutions for enterprises and high-growth startups. With over 16 years of leadership in technology, he is known for driving digital transformation strategies that connect business ambition with outcome-focused execution across healthcare, retail, logistics, and enterprise operations.
Recognized as a strategic industry voice, Gourav brings deep expertise in product strategy, AI adoption, and platform engineering. Through his insights, he helps decision-makers prioritize market traction, operational efficiency, and long-term ROI while building resilient, user-centric digital systems.