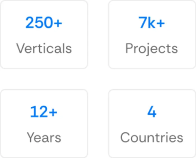
150+ minds across 4 countries. Join a culture of innovation, ownership & growth.
Rewire for AI
From machine learning to deep learning, from classification tools to overall process automation – our AI engineers will help you retool your existing system or enhance your company results.
Ship faster, scale smarter, built for product companies and SaaS teams
Our Latest Work
We strive hard to deliver result-driven digital solutions across the globe. Check out our case studies to get a glimpse of how we ideate, innovate, and create unconventional digital solutions according to the requirements of our clients.
Discover diverse and passionate insights from our tech enthusiasts. We collaborate across various sectors to streamline operations and drive innovation. Explore our rapidly growing collection of articles to see why we’re at the forefront of IT solutions.
The decision to move from Magento to Shopify is one of the most significant replatforming choices an ecommerce business can make. Magento is powerful, but its power comes with...
Accuracy gap is real: Traditional CPG forecasting carries a 25-40% MAPE error rate. AI-powered models bring that down to 8-15%, according to McKinsey research....
Figma has gone from a rather standard graphics editing tool to a revolutionary design application that has taken the design industry by storm. Many developers and designers have been blown away by how well it works and the significant number of impressive features it offers. Figma has undeniably become one of the best user interface design and graphics editing apps designers use nowadays to create all sorts of graphic design works. Whether it is for developing mobile application interfaces, making attractive social media posts, wireframing websites, design prototyping, or any other graphics editing projects, Figma will never fail you.
Webflow, on the other hand, is a visual web design tool that designers use to create professional websites, digital portfolios, custom eCommerce stores, and blogs. Webflow is not just a traditional website builder but also a hosting platform and content management system. With Webflow, designers can build custom web pages from scratch more quickly and flexibly without risking quality.
If you have designed a website or a user interface(UI) and want to bring it to life on the Webflow platform, you can convert your Figma design to Webflow to create a fully functional website. The process of converting Figma to Webflow involves exporting the necessary assets from Figma and importing it into Webflow.
Figma and Webflow have become popular choices for designing and developing websites. Webflow developers use Figma to make the design and add animations/interactions before building the website in Webflow. In today’s blog post, we will outline a detailed step-by-step guide or tutorial on seamlessly exporting Figma to Webflow i.e., giving life to your Figma design and turning it into a fully functional, professional-looking live website with Webflow. So, Stay tuned!
You will need two essential things before converting your Figma design to Webflow. To get started, you must first have these two:
An account in Webflow where you will import figma to webflow asset.
Access to the Figma design asset files you wish to move to Webflow.
Now that you already have these two essential things let’s keep the ball rolling and proceed with the step-by-step guide on how to convert Figma to Webflow.
Step-By-Step Guide to Convert Figma to Webflow
If you’re new to figma and webflow or have a Figma design that you want to convert into webflow. This detailed figma to webflow tutorial will help you easily understand the entire process and carry out the webflow figma integration efficiently.
Without further ado, let’s start this journey of converting Figma to Webflow.
Step 1: Creating a New Webflow Project
Building a Webflow website starts with creating a new project. To do it, simply click the blue “+ New Project” button on the upper right side of your Webflow dashboard. Build the website from scratch.
✰PRO-TIP: Create a separate directory or folder for this specific project to keep things organized in one place. You can also choose to make a main folder and a subfolder for each project you work on. You will find this beneficial later, especially if you plan to build another website in Webflow soon. Also, this structure categorization follows how Figma organizes projects. This is also the structure you will use when export figma to webflow.
However, if your Figma project already has a defined style guide, you may opt not to create folders and subfolders. Today, let us assume you don’t have any style guide illustrated for your Figma project.
Step 2: Defining Your Style Guide / Global Styles
After starting a new site, it is time to define your style guide or global styles. These are the default elements like headings, spacing, link appearances, colors, font styles, and paragraph styles that your website needs. Defining a global style will eliminate the need for you to edit individual pages or blocks repeatedly. It will also ensure that style consistency is maintained across all pages of your website.
Copy or clone the base style guide or HTML tags template that Webflow provides.
Then, paste the copied template into the newly created website on a separate page under the main project folder.
Define the global style by picking the element you want to define on the canvas.
Then, hover the mouse towards the class selector field. You can see this field in your screen’s top right corner.
You will know if the element can be globally defined if the option displays the word “All” in the tag name and if it turns purple/pinkish (as shown in the image below).
✰PRO-TIP: The good thing about Webflow is that it allows you to run two sessions simultaneously. To make copying and pasting the tags template easier and quicker, we suggest you open each project in another tab. You may try to skip this step. However, we strongly recommend you define your global style at this moment, especially the font style, so you can save much time and simplify the process later on.
Finding any difficulty in Exporting Figma to Webflow?
Step 3: Exporting Your Figma Design Assets to Webflow
The next step is to export the assets from Figma. Here’s how you will do it:
Mark all the icons, images, and other assets you want to export from the Figma file. However, if you have already marked the assets or frames for export while still working on the design, simply follow the next step without selecting/marking any frame.
Hit the shortcut command “Ctrl+Shift+E” (for Windows) or “Command+Shift+E” (for Mac). This will open and display the Export dialog.
Click the “Export” button again.
Figma will then ask you where you want to save the design assets.
Once exporting is complete, find and drag the correct file folder into Webflow. Another way to add the file is by clicking the “Upload” button in Webflow’s “assets” panel.
One of the key benefits of working with figma to webflow responsive layouts is the ability to ensure your designs automatically adapt to various screen sizes. You can adjust breakpoints and test how your designs appear on mobile, tablet, and desktop.
Please note: New subfolders will be created automatically in Webflow if the Figma layers contain any forward slashes.
✰PRO-TIP: Consider compressing the images (both JPGs or PNGs) to make them less bulky and heavy.
Step 4: Div-framing your Webflow Website
The next step is div-frame your Webflow website. Here’s how you do it:
Check all larger frames or groups in your Figma file.
Replicate such frames/groups with the divs in Webflow.
Assign a unique name for each div once they are already on the canvas.
And that’s it. You may decide to go without this step, but we suggest you do it anyway. This will help make things well-organized in the future, especially if you plan to add anchor links to your Webflow website.
The website you design in Figma and build in Webflow will never be the same. You will find differences here and there. Moreover, the behavior of elements in design tools may be different in code and on the web. So, you can expect to make some changes to some parts when converting your Figma design to Webflow. You may need to style your classes and tweak your layout.
Webflow is known as one of the best design tools available on the market that is used for designing and implementing interactions. You don’t need to define interactions using other prototyping and animation tools since you can do this in Webflow. You can choose to create complex interactions that include multiple classes or elements or perhaps define one on a per-class basis.
Interaction and animation are pretty broad topics to discuss, so we decided to create a separate blog for this in the future.
The way sites behave on the desktop can be different than on mobile. Unfortunately, Webflow is more on a desktop-first approach than mobile-first. This means that Webflow prioritizes design for desktop displays rather than mobile displays. So, we suggest you refrain from designing the mobile breakpoints unless you have already gone to the desktop.
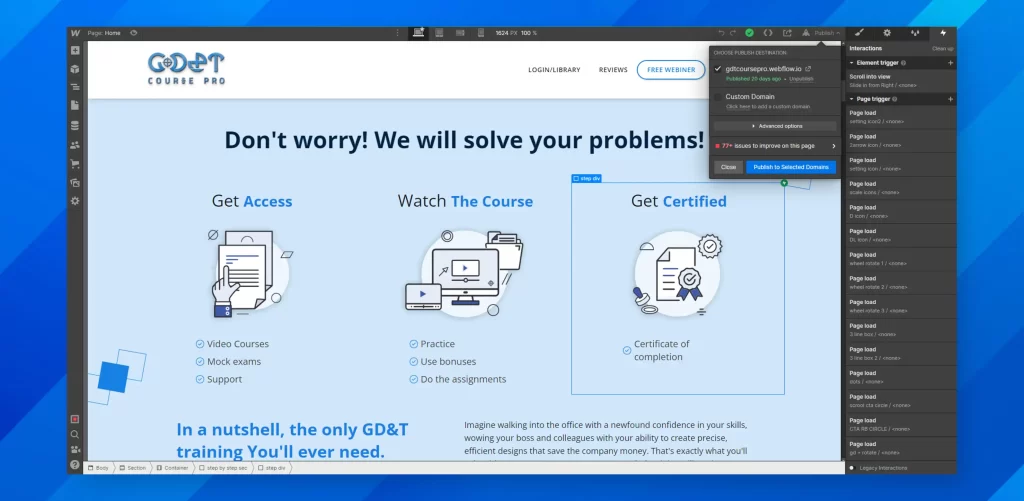
At this point, your Webflow site is already almost 100% complete, and its appearance inside the Webflow Designer is closely similar to how it will look when it goes live. If you think you are already satisfied with your newly built website’s current state, it is about time to finally publish it and bring your design to life.
However, you still need to test it in different environments to ensure everything is working perfectly. You may test your website on different browsers, devices, and mobile operating systems. You can then make necessary changes or fix the errors you find during the test.
Final Words: After Converting Figma to Webflow
So, that’s the step-by-step guide to figma to webflow app. The process may seem simple but convertingFigma to Webflow can be tricky and should be done correctly.
If you want to use both of these fantastic tools but do not have the technical know-how to implement the steps outlined in this article, take a peep at APPWRK IT Solutions.
Hire Webflow Developers from APPWRK as they are experts in doing this and with their experience gained from converting 200+ Figma designs to highly responsive, pixel-perfect, and bug-free Webflow websites, they will make sure that Your Figma to Webflow Conversion is done perfectly without a single piece of error.
Frequently Asked Questions Regarding Figma to Webflow
1. What are the Pros and Cons of Webflow?
Webflow is a famous Content Management system available in the market today. It allows you to create websites without coding.
Pros of Webflow: a) Live Prototyping b) No Plug-ins c) Greater Collaborations d) Short Development time e) Secured Hosting Platform f) User Friendly g) Immersive Interactions h) Pricing Flexibility
Cons of Webflow: a) Lack of Code customizations b) Desktop edits c) Extensive pricing Plans d) Restriction on eCommerce
2. Are Webflow and Figma interconnected?
Webflow and Figma are not directly interconnected but they are both popular tools used in Web design and development. Figma is a web-based design tool used to create user interface (UI) designs, while Webflow is a web-based platform used to build and design responsive websites.
Although they serve different purposes they can be used together in a web design workflow. For eg: A designer can create a UI design in Figma and then export assets such as images, icons, and fonts to use in web flow to build and design the website.
3. Is Webflow Frontend or Backend?
Webflow is primarily a front-end platform that allows users to create websites and web applications using a visual interface. However, it has also some backend functionality such as handling form submissions and user data.
4. What are the Limitations of Figma?
The following are the limitations of Figma:
a. No built-in version control system. b. Limited support for complex vector operations compared to other design tools. c. Limited print design capabilities compared to traditional desktop publishing software. d. Limited offline functionality, as Figma is primarily a cloud-based application. e. No support for third-party plugins or extensions, which can limit its functionality. f. Limited ability to customize keyboard shortcuts or interface elements.
5. Does Webflow affect SEO?
Webflow, as a website builder, does not inherently affect SEO. However, the way a website is designed, developed, and maintained on Webflow can impact its SEO performance. Some factors that can influence SEO on Webflow include:
a. Website structure and architecture b. Page load speed and performance c. Mobile responsiveness and user experience d. Quality and relevance of content e. Proper use of HTML tags and structured data f. Integration with analytics and tracking tools g. Regular updates and maintenance to ensure website functionality and security
By following best practices for website design and development, and implementing SEO strategies specific to your business or industry, you can optimize your website’s SEO performance on Webflow.
6. What is Webflow not good for?
While Webflow is a powerful website builder with many benefits, there are a few things that it may not be ideal for:
Large-scale e-commerce websites: While Webflow has basic e-commerce functionality, it may not be the best choice for managing a large-scale online store with complex features.
Complex web applications: Webflow is primarily a front-end development tool, and while it has some basic back-end functionality, it may not be suitable for developing complex web applications that require extensive back-end development.
Customization of templates: While Webflow has a large selection of templates, it may not be the best choice for users who want to heavily customise their website templates.
Collaboration with developers: While Webflow allows for collaboration with other users, it may not be ideal for collaborating with developers who prefer to work in more traditional code-based environments.
Offline editing: Webflow is a cloud-based platform, which means that it may not be suitable for users who need to edit their website offline.
While these limitations may not be relevant to every user, it’s important to consider them when choosing a website builder for your specific needs.
7. How does Webflow vs Figma differ in terms of functionality?
Ans: Figma is primarily a design tool for creating high-fidelity prototypes, wireframes, and collaborative designs. Webflow, on the other hand, is a website builder that transforms designs into fully functional, responsive websites. While Figma focuses on design, Webflow bridges the gap between design and development by providing a no-code platform to bring designs to life.
8. What is the best method to export Figma to Webflow?
Ans: The best method starts with organizing your Figma design layers and assets, exporting necessary images or icons as SVG/PNG, and then manually recreating the layout in Webflow. This ensures better control over responsiveness and layout accuracy.
9. Can I Turn a Component into Code Webflow?
Ans: Yes, Webflow provides a feature called “Symbols” which lets you create reusable components. Once you design a component, you can save it as a Symbol and reuse it across multiple pages. Additionally, you can export Webflow’s code if needed for external development.
10. How can I convert Figma to Webflow variants?
Ans: Figma variants represent different states of a single component, such as buttons with hover, active, or disabled states. In Webflow, these can be recreated using Webflow’s interactions and animations, ensuring the design intent is preserved in the final website.
11. How to Convert a Figma Prototype to Webflow Interactions?
Ans: To convert a Figma prototype to Webflow interactions, follow these steps: Step 1: Analyze the Prototype: Identify key interactions like hover effects, clicks, and scroll animations. Step 2: Export Assets using Figma’s export tools to get images, icons, and components in Webflow-compatible formats. Step 3: Build the static layout in Webflow using div blocks and grids. Step 4: Implement Interactions by using Webflow’s Interactions Panel to replicate Figma’s animations with triggers like hover, click, or scroll. Step 5: Test and Refine to ensure animations work smoothly across devices and browsers
12. How to Make a PDF of Figma Windows?
Ans: To create a PDF of your Figma designs on Windows, follow below-mentioned steps: Step 1: Navigate to the design that you want to export. Step 2: Click on the frame(s) or group(s) to include in the PDF. Step 3: Go to the top-right menu, click on File > Export, and choose the “PDF” format. Step 4: Navigate to settings and select“All Frames”if multiple frames are involved. Step 5: Save the PDF and click on Export, choose a folder, and then save the file.
Gourav Khanna is the Co-founder and CEO of APPWRK, leading the company’s vision to deliver AI-first, scalable digital solutions for enterprises and high-growth startups. With over 16 years of leadership in technology, he is known for driving digital transformation strategies that connect business ambition with outcome-focused execution across healthcare, retail, logistics, and enterprise operations.
Recognized as a strategic industry voice, Gourav brings deep expertise in product strategy, AI adoption, and platform engineering. Through his insights, he helps decision-makers prioritize market traction, operational efficiency, and long-term ROI while building resilient, user-centric digital systems.