How to Migrate WordPress Websites to Webflow?
There are more than 73 million websites on the world wide web today that use CMS – 30,462,105 of them are powered by WordPress.
With a market share of more than 41%, WordPress is known as the most popular and most widely-used CMS. WordPress has maintained its reputation over the years as the number one CMS choice for web developers and site owners.
Sounds impressive, right?
But do you know that even with WordPress’ impressive figures and reputation, many website owners are considering moving their projects to Webflow? Yes, more and more site owners are getting interested in migrating their WordPress websites to Webflow in the future. And why is that? In today’s post, we will discuss the primary reasons why site owners are migrating their websites from WordPress to Webflow and why many others are interested in doing the same.
So, stay right there, and together let’s delve into why WordPress to Webflow migration is becoming a thing nowadays.
Table of contents
Reasons To Migrate From WordPress to Webflow
Lack of Design Freedom in WordPress
As professional website developers and designers, we don’t just design and build visually appealing websites. We develop websites that offer functionalities and usability that will engage our target users and meet their needs.
As experts in our field, we can create any website our clients ask for and even make them a lot better. However, sometimes we cannot deliver the kind of site we ought to build because WordPress doesn’t allow us to implement certain designs, features, and functionalities.
WordPress’ lack of design freedom sometimes restricts our creativity and ideas. Thankfully, we found a better solution to this problem through Webflow.
Webflow is like a dream come true for many website designers. It offers the design freedom WordPress doesn’t. Using a Craft CMS like Webflow, website owners, developers, and designers are given all the freedom they need to design and build impressive websites just as they want without being restricted by specific themes.
To know more about Webflow & its marvelous features in detail – don’t forget to read:
What is Webflow? APPWRK IT Solutions
Dependency on Third-Party Hosting
Yes, you can have your website directly hosted from the WordPress.com site. However, this option often limits site owners and designers in what they can do with their WordPress websites. Having your web hosted directly from WordPress.com may not be the best option for many websites, especially regarding cost or budget.
The annual hosting cost of WordPress ranges from $50 to $540. While, third-party hosting services cost around $23.88 to $98.88 per year ($1.99 to $ 8.24 per month) depending on factors like bandwidth limit, storage limit, and extra offerings (i.e., SSL certificate, business email, and free domain name). Hence, a number of WordPress users prefer third-party hosting only.
But Webflow is a game-changer. It is not only a CMS and website builder but also a hosting platform that is way cheaper than WordPress. Therefore hassle of attaching and operating a WordPress site with third-party hosting ends here. Hence, it is recommended to use Webflow for your next website needs.
Webflow is not only a CMS and website builder but also a hosting platform. You can have your site hosted in Webflow. This means that you no longer need a third-party hosting service to power your Webflow website.
Every Webflow plan comes with AWS hosting, which delivers incredibly robust hosting, quick installations, better security, and scalability.
Know more about Webflow Pricing and Plans in detail & which one suits you best?
Webflow Website Cost | APPWRK IT Solutions
Maintaining Your Site
WordPress websites require frequent updates. The problem is that maintaining a WordPress website can be a pain in the neck, especially if you have a limited budget, or perhaps your knowledge and capability in design programming aren’t enough for you to do and complete all the needed tasks successfully.
Most of the time, updates can cause compatibility issues. You must make certain adjustments to the theme, programs, plugins, and content to ensure everything is working well. The process can be more challenging if you have plenty of plugins.
Webflow updates are intuitive and done automatically. These automatic updates rarely cause any issue and thus, would require less manual work and adjustments. This makes Webflow sites easier to maintain than WordPress websites.
Setting Up Your Website
Simply creating a WordPress account and installing the software is not enough to create a website. You need to use a few plugins and a theme to make your website functional
But, building a basic website in Webflow is just like a one-click configuration. You can quickly get an admin login, select a theme, create a few pages, and upload your content. That’s it! You don’t even need to do the coding work
Webflow has a drag-and-drop website editor and comprehensive tools that give you better control over the different aspects of your design, including the content breakpoints and other elements. With Webflow, you can build a responsive website and create a design for users without coding.
However, if you intend to build a professional website with lots of pages, content, custom plugins, functionalities, and features, setting up would require coding and the expertise of an experienced web designer and developer.
By now, you must have understood – why people are quickly moving their websites from WordPress to Webflow.
Still in confusion, please check out this article!
Webflow vs WordPress: which is better in 2022-2023?
Updating Your Site Content
Creating and updating content on WordPress would require you to upload and publish manually written or prepared content one after another. Doing so can take time and effort, especially if you have lots of content to add and publish.
With Webflow, however, you can save much time with its content automation system – the CMS or engine. The system allows the automatic generation and reproduction of new blog posts. You just need to write the content, publish it, and then the system will take it from there. The engine will generate the blog/article/content based on pre-determined parameters and best SEO practices.
Now that you know the primary reasons why many website owners are considering moving from WordPress to Webflow, let’s proceed with our next topic- the content migration algorithm.
Why Should You Migrate to Webflow?
Apart from the reasons why website owners are moving from WordPress to Webflow, we have below some advantages of Webflow. These advantages will show you why you should migrate to Webflow.
- No plugin compatibility issues or errors.
- Custom, user-friendly, and built-in client-facing CMS.
- Prototypes to mockups – better precision between live site and mockups.
- Creating responsive designs is 10x easier.
- Offers automatic site versioning or backups and staging URLs.
- Bridges the gap between content and design.
- It offers a faster, better, and easier way to build dynamic landing pages.
- Enables designers to work with code visually.
- Allows faster iterations while in the design review process.
- It allows you to design hundreds of pages in one go.
- Bridges the gap between design and development.
- Offers team templates that promote better design consistency and faster design speed.
- Automatic CMS and designer updates, and many more.
Let’s start with our main topic for today’s blog- how to migrate a WordPress website to Webflow.
Steps Before Migrating WordPress Website to Webflow CMS
Migrating WordPress to Webflow includes first exporting all your content from WordPress and importing it to Webflow.
Exporting WordPress content
You can use a built-in export feature or a plugin to export content from WordPress.
Steps for exporting WordPress content
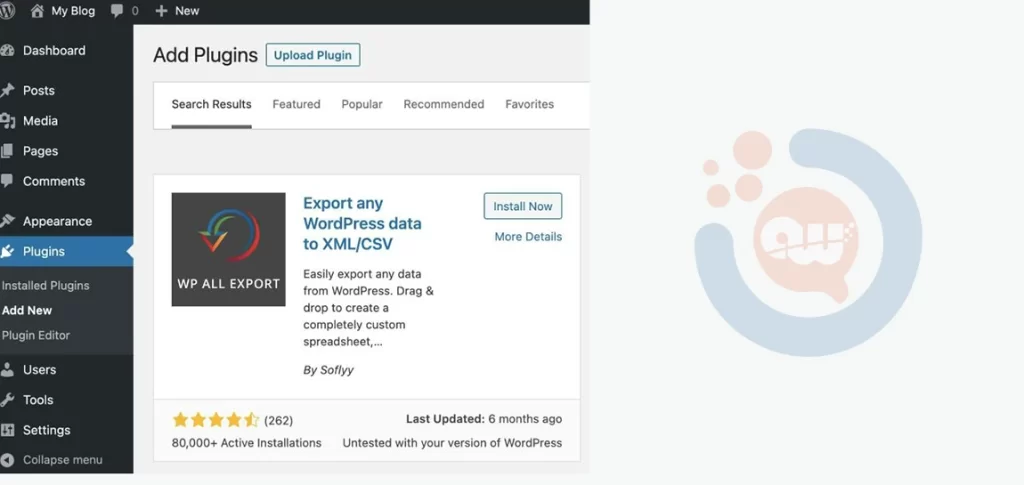
1. On the plugin tab of your WordPress admin dashboard, click the “Add new” button.
2. Type “Export any WordPress data to XML/CSV.”
3. Install and activate the “Export any WordPress data to XML/CSV” plugin
4. Head to the “All Export” setting and specify the content you don’t want to export.
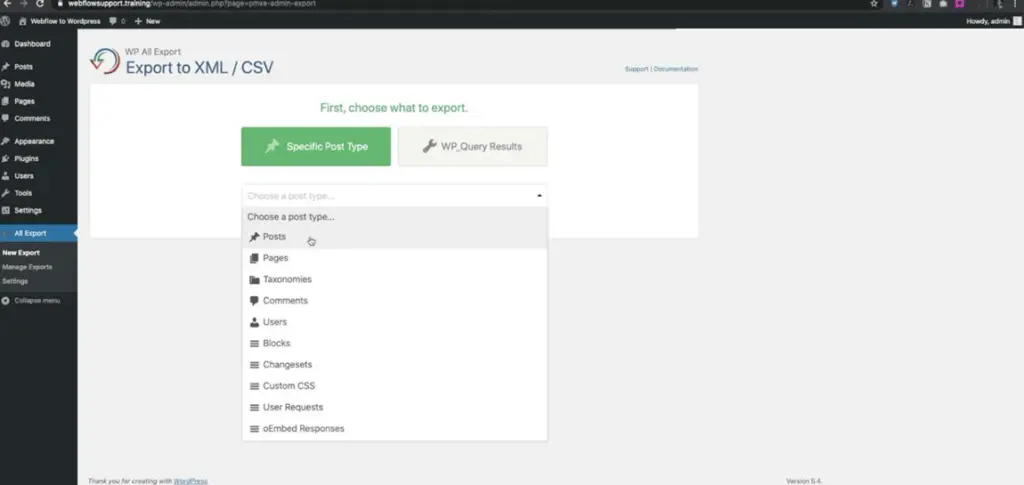
5. Click “Migrate Posts.”
6. Click “Confirm & Run Export.” The CSV will then be downloaded to your browser.
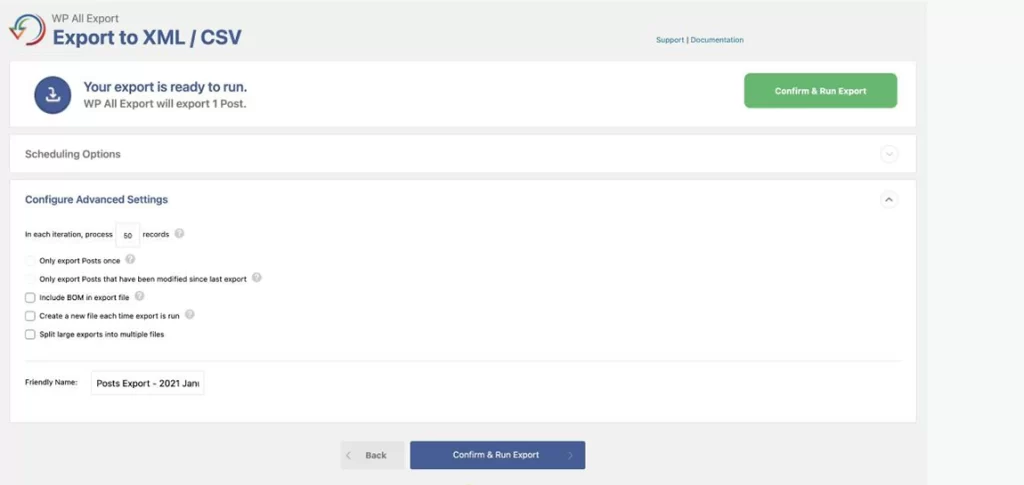
7. Download the file by clicking “CVS.”
Make sure to export the content in a format that can easily be uploaded to your new Webflow website. Using the correct format and plugin is quicker and easier than manually copying and pasting each content from WordPress to Webflow.
Importing content to Webflow
Here’s how to import your content to Webflow.
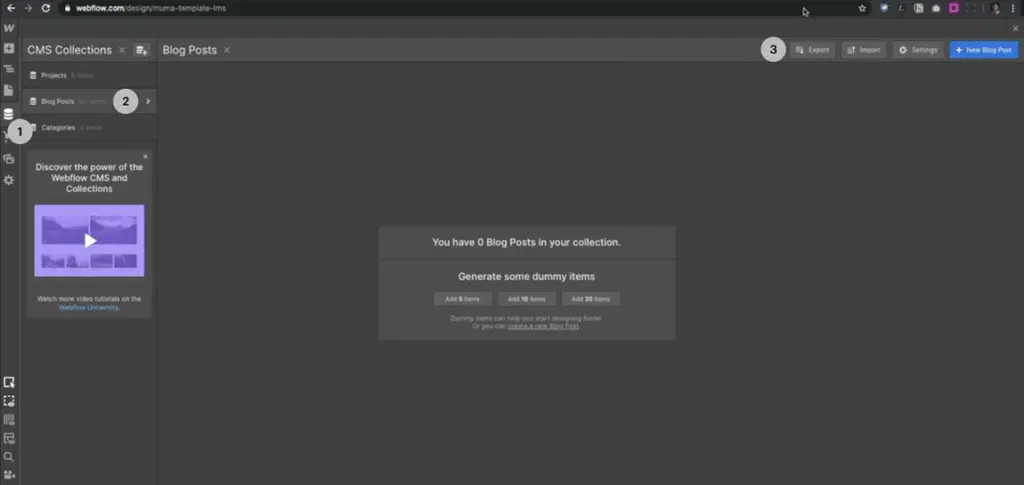
1. Open the “Collections” panel on your Webflow project.
2. In the “CMS Collections” panel, click “Blog Posts.”
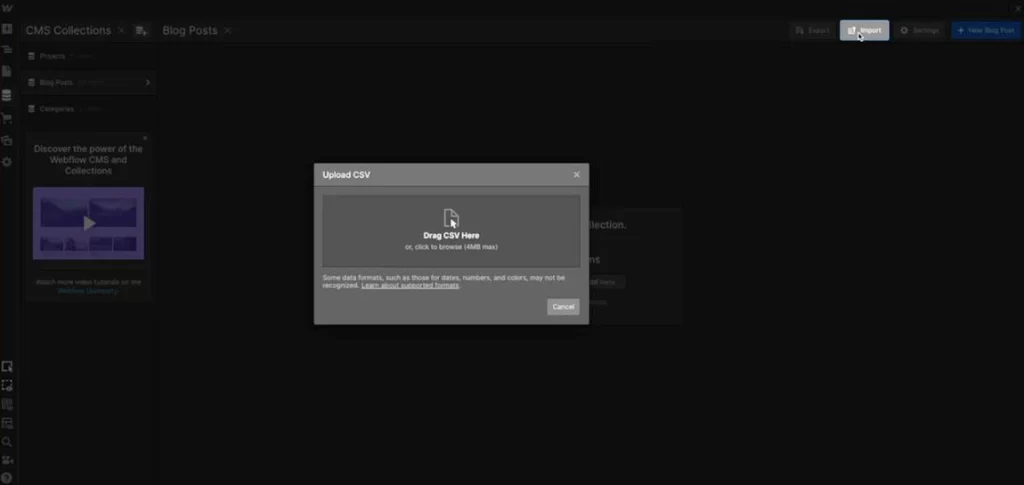
3. Click “Import” located in the top left corner of the screen.
4. Map the fields from the CSV you exported from WordPress to that of your “CMS Collections.” You may also make new fields if you need to.
Note: Multi-reference, reference, and file fields can’t be mapped. For fields that were not mapped, you need to update them manually.
Pay Attention to Images
The images on your WordPress website will be exported together with the content. Unless you exclude the images when configuring your export setting, they will be included in the CSV file. Once you are done with data migration from WordPress to Webflow, try to check the images to make sure nothing is messed up during the process.
SEO Tips
Website migration can affect organic search traffic. However, SEO would not be an issue if migration is done correctly. Here are some SEO tips to improve your search traffic and ranking when migrating from WordPress to Webflow.
Setting up 301 redirects
One of the major pain points when moving from WordPress to Webflow is having broken pages. Broken pages will drive away visitors and push them to go elsewhere. Broken pages also result in unnecessary loss of backlinks.
To fix this issue, you have to set up 301 redirects. Thankfully, Webflow allows quick and easy 301 redirect settings. To set up 301 redirects on Webflow, follow this instruction:
- Open Project settings.
- Supply the necessary details in the fields:
- Old Path
- Redirect to Page
- Click the “Add Redirect Path” button.
And that’s it.
Meta titles and descriptions
Don’t forget to update your meta tags, descriptions, and titles when moving your website. These elements provide references and information about your page’s content. They help Google understand what your content and page are all about.
Alt tags
To ensure your images are referenced well, you have to update the alt tags (also referred to as alt description or attribute). Alt tags are HTML attributes that provide images with text alternatives for Google and other search engines.
Robots.txt and sitemap
Setting up a sitemap and robot.txt file allows search engine crawlers to access only the URLs of the pages you want them to see while you overhaul your site’s structure or visuals.
The sitemap will help you identify the pages that are already indexed and the backlinks you have on your website – knowing all these details lets you know which pages and content need to be prioritized during the migration process. The sitemap will likewise help you set your 301 redirects accurately.
Open Graph images
Open Graph images, or simply OG images, are the images that will be displayed when you post video content on Facebook, LinkedIn, Twitter, and other social media pages or when you share a link to a web page or a website. Adding OG images will make your content look more interesting and attractive. It also helps your target audience and the social media pages to understand what your content is all about in just one glance.
DNS settings
It is essential to link your previous domain to Webflow. You can do this by resetting or updating your DNS settings.
Steps to Perform a WordPress to Webflow Migration
Migrating a website from WordPress to Webflow can be overwhelming. We understand how important it is to conserve your SEO efforts during migration. To help keep things more uncomplicated for you, we have outlined a checklist of the crucial steps you need to take to successfully perform a WordPress to Webflow migration.
Our Webflow migration team walks the extra mile to ensure that the migration is done safely and properly while conserving all your SEO efforts. Check out our Webflow developer and designing teams’ process when moving websites from WordPress to Webflow.
Pre-migration
First, you need to prepare everything before migration. We call this the pre-migration stage. This stage includes:
Perform sitemap analysis
You can start this stage by identifying your website’s linking structure or sitemap.
Create staging site
After a thorough sitemap analysis, you can then create and set up a staging website. Export database
The next step is to export your database from WordPress.
Identify page and meta tags
The last step for this stage is identifying the page and meta tags. Now that we have everything set let’s proceed to the migration stage.
Migration
This is where the actual migration process takes place. To seamless and safely perform a migration between WordPress and Webflow, you will need the following steps:
- Transfer metadata
- Identify and fix any 404 errors
- Re-create or update the sitemap
- Redirect all your WordPress content to your newly created WebFlow website
And that’s it. Now let’s check what to do next.
Post Migration
Moving a WordPress website to Webflow does not end with the migration itself. There are things you need to consider to ensure that you have successfully set up your new site and that everything is working and looking the way it should.
For the post-migration stage, you need to:
- Address any errors you find after migration
- Connect or re-connect Google Analytics without losing any data
- Monitor the pages that have been indexed.
That wraps up the process of performing WordPress to Webflow migration.
Final Words: WordPress to Webflow Migration
We hope this guide can help you properly migrate your website to Webflow without losing your web traffic. While it may seem simple and straightforward for someone expert in this field, performing the entire migration process without the right experience and expertise can be detrimental to your website and SEO efforts.
Chances of losing page indexes are higher when the process is handled by a non-technical individual or by someone with just a little knowledge about the ins and outs of Webflow migration. To ensure a seamless and successful migration, it’s wise to let expert Webflow designers and developers do the work.
You can hire Webflow Developer anytime from APPWRK and he/she will serve you with quality at par perfection – That we can guarantee!🙂
Related Links:
About The Author





 Free Quote


