150+ minds across 4 countries. Join a culture of innovation, ownership & growth.
Rewire for AI
From machine learning to deep learning, from classification tools to overall process automation – our AI engineers will help you retool your existing system or enhance your company results.
Ship faster, scale smarter, built for product companies and SaaS teams
Our Latest Work
We strive hard to deliver result-driven digital solutions across the globe. Check out our case studies to get a glimpse of how we ideate, innovate, and create unconventional digital solutions according to the requirements of our clients.
Discover diverse and passionate insights from our tech enthusiasts. We collaborate across various sectors to streamline operations and drive innovation. Explore our rapidly growing collection of articles to see why we’re at the forefront of IT solutions.
The decision to move from Magento to Shopify is one of the most significant replatforming choices an ecommerce business can make. Magento is powerful, but its power comes with...
Accuracy gap is real: Traditional CPG forecasting carries a 25-40% MAPE error rate. AI-powered models bring that down to 8-15%, according to McKinsey research....
What great things does a beautifully designed website with informative and engaging content give if it never got seen or noticed by the right audience? Moreover, what is the point of building a great-looking online shop if you don’t know how to effectively market your excellent products and services and bring them in front of your target customers?
You see, knowing who to reach, how to reach them, and how to build a lasting business relationship are critical to the success of any brand. And when it comes to reaching the right audience, one best option is MailChimp.
In this Blog, You will Learn in detail how to Integrate Webflow with Mailchimp and enjoy the supreme benefits which happen upon their connection.
MailChimp is an all-in-one email service provider (ESP) and automation marketing platform for creating professional-looking email marketing campaigns, managing audiences, and managing mailing lists. Integrating MailChimp into your Webflow website allows you to engage with your prospective customer base or audience through email.
Why Choose MailChimp for Webflow?
With the pool of email marketing platforms available, why should you choose MailChimp for Webflow email marketing? Well, here are the top reasons why MailChimp is known as the leading email automation platform in the market today and why it is so loved by millions of Webflow websites worldwide.
It is highly flexible and user-friendly, making it perfect for all users, including those non-technical people.
MailChimp offers a free plan (the monthly limit is up to 10,000 emails).
MailChimp is feature-rich. It offers many valuable features that you can use for list segmentation, integration, scheduling, and reporting, to name a few.
It has superb customer service.
It provides insightful analytics and reporting.
And many more.
Now that you have a quick idea of what MailChimp is and why you should choose it, let us talk about how you can integrate it into your Webflow website.
Connect Your Webflow Signup Form to a MailChimp List
Watch this Quick Video Tutorial on How to Integrate Mailchimp with Webflow or Continue Reading the Blog!
Here is the step-by-step guide for Webflow MailChimp integration.
1. Create a MailChimp Account
The first thing you need in order to integrate MailChimp with Webflow is a MailChimp account. If you have a MailChimp account, simply log into your account and proceed to STEP 2. However, if you still don’t have an account, you will need to create one.
Here’s how to set up an account with MailChimp :
• Visit the Mailchimp official website. • Click the “SIGN UP” button in the upper right corner of the website’s front page. • Fill in the “Sign Up for MailChimp” form with your email, username, and password, and then click SIGN UP.
• After clicking “SIGN UP”, you can see a confirmation message. • Check your email for the account activation email from Mailchimp Client Services. • Click “ACTIVATE ACCOUNT” to complete the activation step. • MailChimp will then display the “Confirm Humanity” screen. To confirm that you are human, click “I’m Not A Robot”.
Congratulations! You now have successfully set up your MailChimp account. It is now ready for Connecting to Webflow.
Notes to remember:
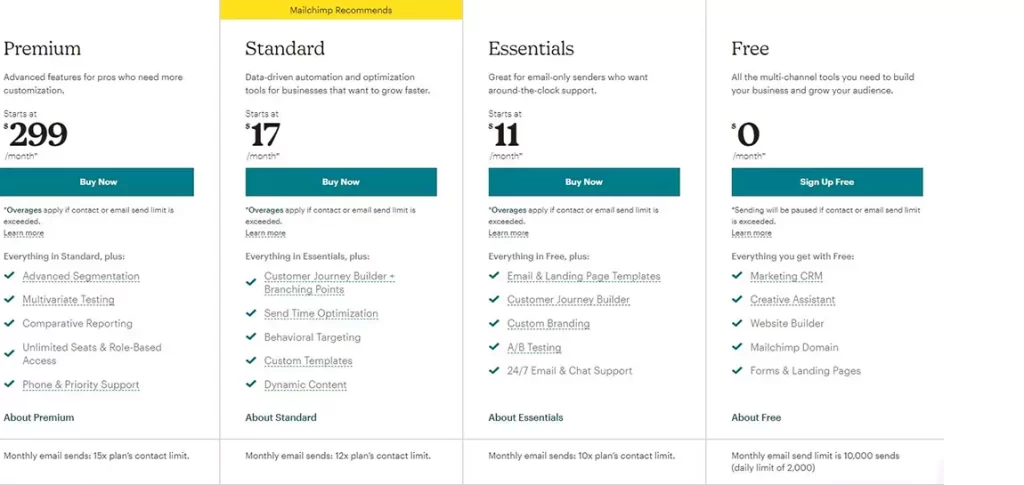
• You will be required to add a valid and working email address. Your email address will serve as a communication medium between you and MailChimp. • Make sure to comply with MailChimp’s Terms of Use and anti-spam regulations at all times. • MailChimp blocks and forbids the use of role-based email addresses (i.e., sales@website, support@website, marketing@website, info@website, admin@website, etc.) in setting up new accounts. • Creating a free plan doesn’t require a credit card. However, if you wish to upgrade your plan, you must add your credit card information. Here’s an updated pricing list of MailChimp plans.
Now that you already have a MailChimp account, you can start connecting your Mailchimp account to your Webflow website. Here’s what you should do:
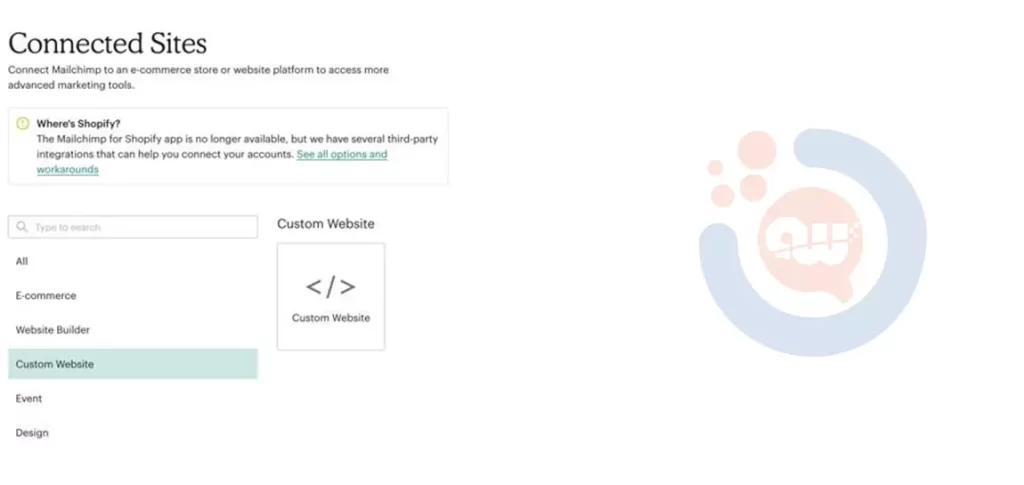
• Log into your MailChimp account. • Find the “Audience” tab and navigate the menu options. • Click on the “Connect a Site” menu option. • Look for the “Custom Websites” option and click it.
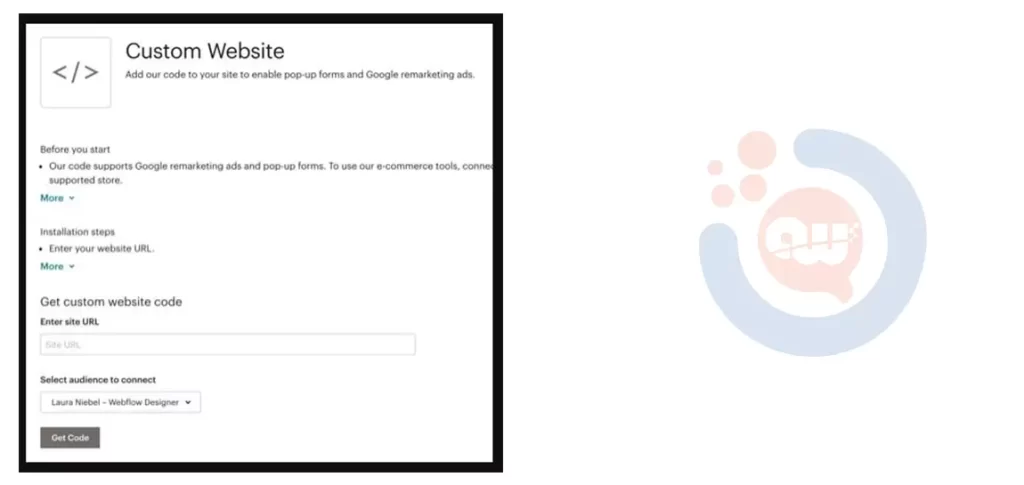
• Click the “Get Code” button. • Then, copy the generated code.
Once you have already copied the generated code, it is time to add it to your Webflow site.
3. Add the code generated by MailChimp to your Webflow site
Here’s how you can add the code generated by MailChimp to your Webflow website.
• Open your Webflow site settings. • Go to “Custom Code.” • Add the copied code into the “Header Code” area. • Save changes, then head back to your MailChimp dashboard. • To check if a connection between MailChimp and Webflow is already established, go back to the “Connected Sites” section in your MailChimp dashboard. • Navigate the options and click “Check Connection.”
You will know if this step is successful if you don’t receive any error messages. If that’s the case, you can proceed to the next step.
4. Retrieve the “Action” code from MailChimp
To retrieve the “Action” code, follow these steps:
• Go back to the MailChimp site and look for the “Audience” menu option. • Click the “Manage Audience” option from the drop-down menu. • Check the “Signup Form” and select “Embedded forms.” • Copy the code you find in the text editor and then look for the phrase “form action.” • Find the URL written after the “form action” element. •Copy and paste the URL to your clipboard.
It’s now time to insert this code into your Webflow form.
5. Insert the MailChimp “Action” code into your Webflow form
Below are the steps to add the “Action” code into a Webflow form.
• To add the “Action” code to your website, you must first set up a subscription form in Webflow. Don’t forget to add the name and email address fields. • Head to the navigator in your Webflow settings and choose “Form Settings.” • Choose the form element you want. • Fill out the displayed “Form Settings” form. Add the “Form Name.” • Paste the “form action” code or URL from MailChimp (the URL you copied in STEP 4) into the action field. • Choose “Post” for the method.
6. Test your form
You need to test your form to make sure it is working. You can do so by following these instructions.
• Open the page in your live Webflow website where the form is displayed. • Please fill out the form with the required information and submit it. • After that, try to log in back to your MailChimp account. • Under the “Audience” option, click “Managed Contacts.” • Then check if the email address you used for testing the form appears in the list.
If the email address appears in the list, then you are good to go. Otherwise, check the previous steps and see if you missed anything.
7. Publish your Webflow site!
And that’s it; your Mailchimp Webflow integration is done! You have successfully integrated MailChimp with your Webflow site. Now, it’s time to publish your Webflow site if you haven’t done it yet.
Integrate Mailchimp with Webflow perfectly!
Hire Masters of Webflow and Mailchimp. They will do it in no time, error-free!
Integrating MailChimp into a Webflow website is easy but can also be pretty tricky. If you face any issues, you may consider hiring a professional to do the task on your behalf. We will help you integrate or connect your MailChimp into your Webflow site seamlessly and quickly.
Whether you need help with any issues regarding Webflow MailChimp integration or you want to outsource any website development project, you maycontact APPWRK anytime. Let us discuss your concerns, goals, and requirements. After that, You can hire Webflow developers and designers who will provide you with a robust, customized solution.
Gourav Khanna is the Co-founder and CEO of APPWRK, leading the company’s vision to deliver AI-first, scalable digital solutions for enterprises and high-growth startups. With over 16 years of leadership in technology, he is known for driving digital transformation strategies that connect business ambition with outcome-focused execution across healthcare, retail, logistics, and enterprise operations.
Recognized as a strategic industry voice, Gourav brings deep expertise in product strategy, AI adoption, and platform engineering. Through his insights, he helps decision-makers prioritize market traction, operational efficiency, and long-term ROI while building resilient, user-centric digital systems.