Step-by-Step Process to Submit an App to the App Store Using App Store Connect
After spending a lot of time watching your dream app getting developed, you must be excited about its launch. But do you know how to submit an app to the app store?
If not, then this blog on how to submit the iOS app is for you. It will take you on a journey where you will learn a step-by-step procedure to submit your app to the app store swiftly.
So without any delay, let’s dive straight into the procedure.
Table of contents
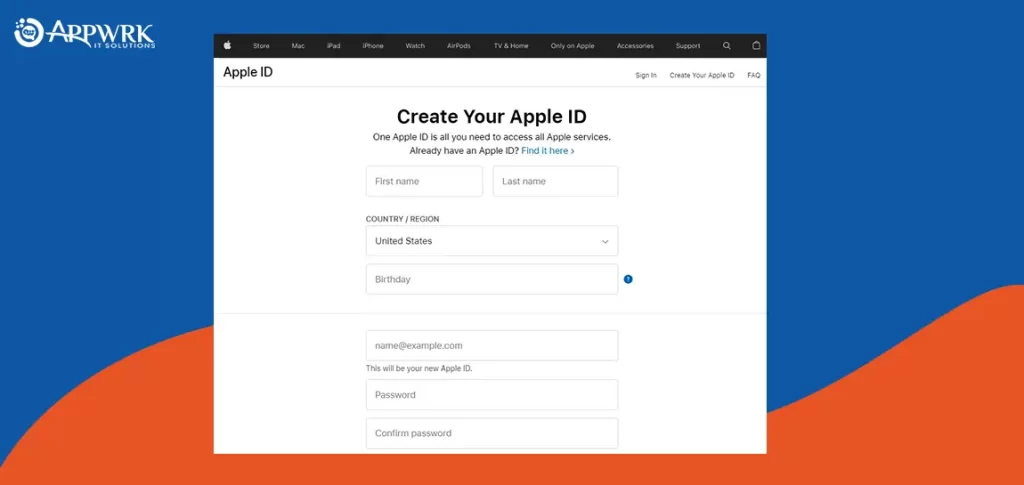
Create an Apple ID
In order to submit an app to the Apple store, the first step would be to discuss with your developers and ask them “how do you make an app for the app store” and how it is different from building a regular application. Once you have built an application that satisfies the specific criteria of Apple stores, you should move on to thinking about how to submit ios app to app store.
To submit an app to the app store, you are first required to create an Apple ID. It will give you access to all services offered by Apple.
Enroll Yourself in Apple Developer Program
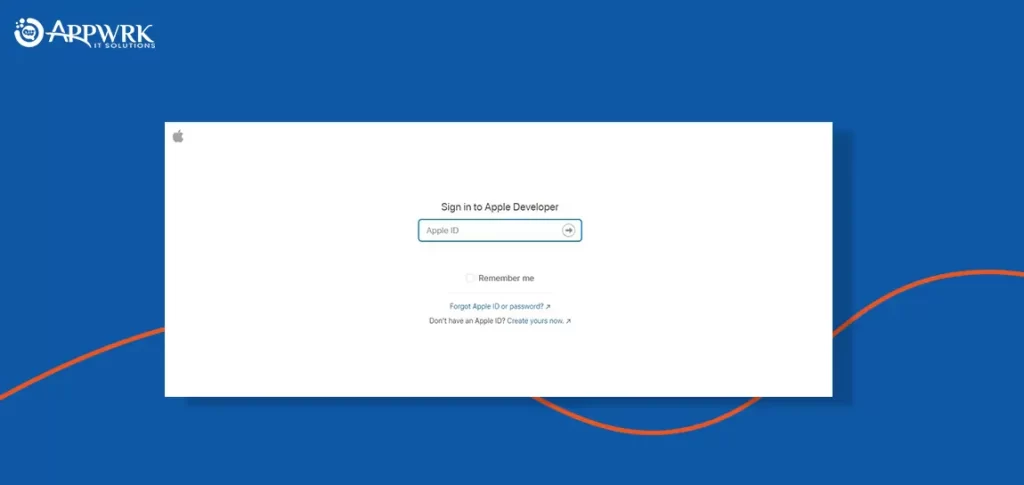
Once you have finished the first step to upload ios app to app store which is creating an Apple ID, the next step for submitting an app to the app store is to sign up for the Apple Development Program. You can do the same through your Apple ID. To publish ios app to app store, this is an integral step as it allows access to the resources and tools required for testing the app. In addition to this, you can also gain technical support by a team of experts to upload to app store and submit the app.
Benefits of enrollment as a member of the Apple Developer Program
- Access to Beta Software
- Availability of tools and resources needed to develop and distribute the App
- Complete set of services for delivering advanced features
- App testing tools
- Expert Technical support
- Analytics tool for your App
Sign in to App Store Connect
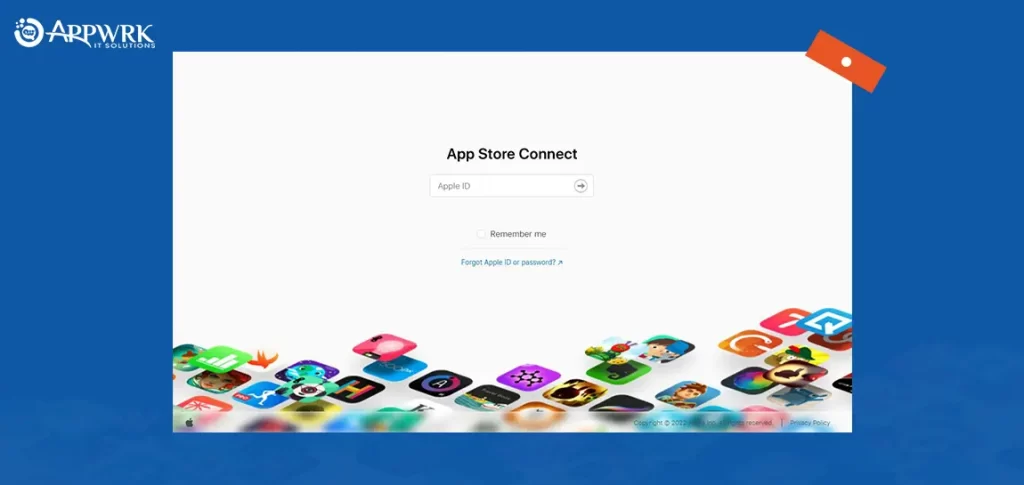
App Store Connect is a website that lets you manage almost anything you want in your app in the App Store itself. If you have been wondering, “how do you connect to the app store?”, by using app store connect, sign up or log in using your Apple ID to continue.
To properly submit application to app store, you need to complete this step which will provide you with a dashboard where you can manage the metadata of your app and edit the details like pricing and availability before you upload app to app store.
Along with this, signing in to App Store Connect also facilitates Apple’s review process that occurs once you submit app to app store. Once app store submission is over, the Connect will give you access to detailed app performance analytics like sales reports and user feedback which will be extremely valuable to your application.
Get Your App Ready for Submission
Earlier we looked into the external aspects on how to upload ios app to app store, now let’s move on to the internal aspects which is getting your app ready for Apple’s certification process. To publish ios app to app store, you must undergo an app certification test before submitting an app to the app store. This will involve a review of your app by an assigned person following the App Store Review Guidelines. If you are unsure on how to get an app in the app store, you can go through the guidelines in advance to ensure you are heading in the right direction.
Note: If you want to know more on how to upload app to app store and ensure that there are no rejects, you need to read the guidelines listed and check your app for any errors in advance. If any error is found during the review process, it may result in app rejection. Therefore, go for testing like low network, low storage, compatibility with older devices, and so on. You can take the help of a certified mobile app developer and tester.
Use App Store Connect to Create an App Store Listing
The next step to submit an app to the app store is to create an App Store listing following simple steps. Sign in to App Store Connect using your Apple ID.
-
Sign in to App Store Connect using your Apple ID.
-
Select My Apps from the dashboard.
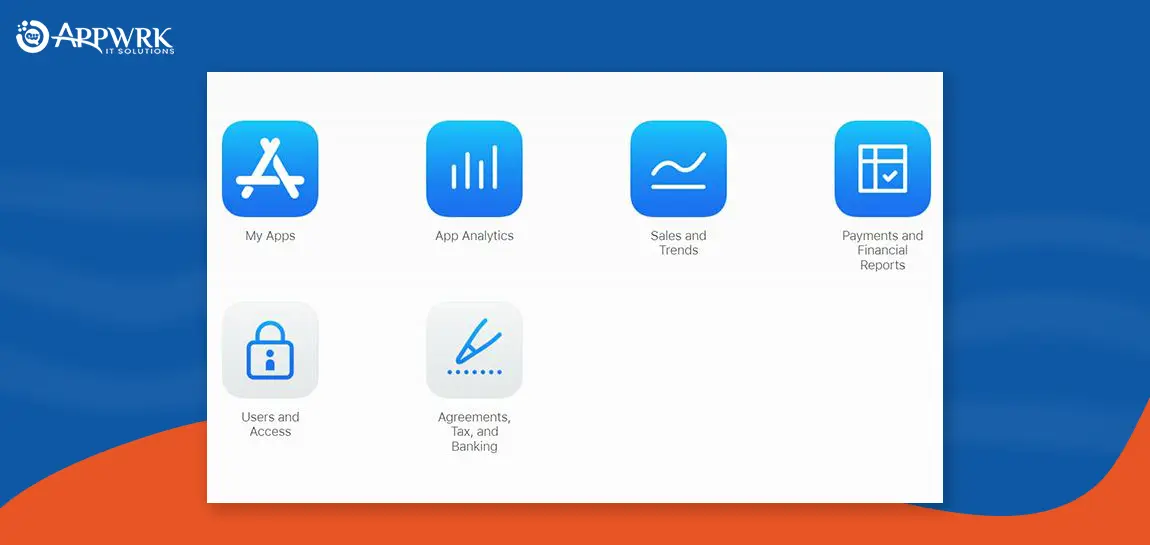
Select My Apps from the dashboard -
Click the “+” icon in the upper left corner and select New App from given options.
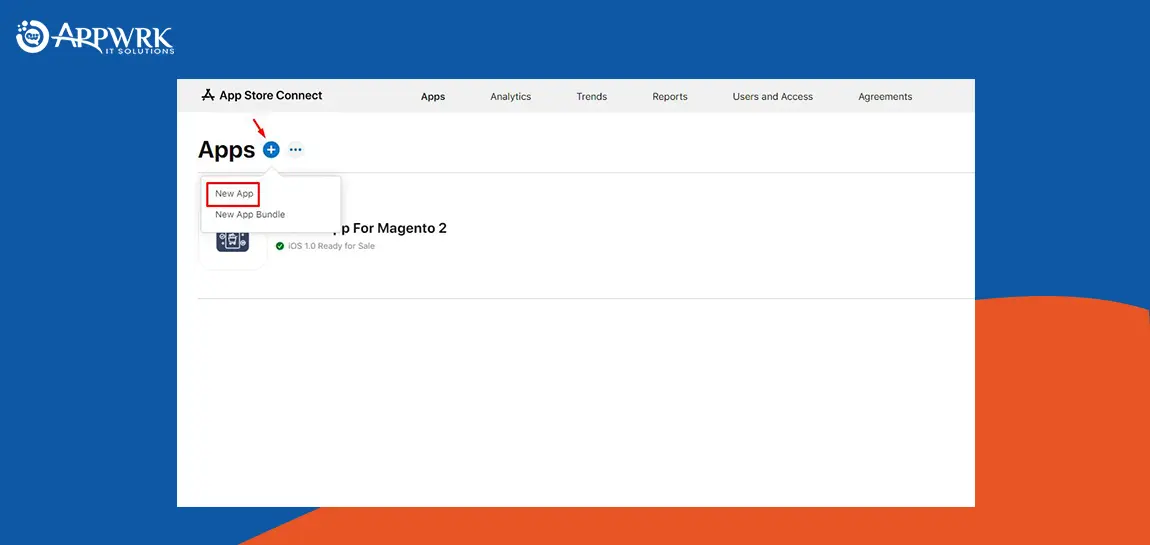
Click the “+” icon in the upper left corner and select New App from the given options -
Select the platform for your app and fill in the required information in the respective sections. Once filled in successfully, click on Create.
Note: Users can use “?” to know more information.
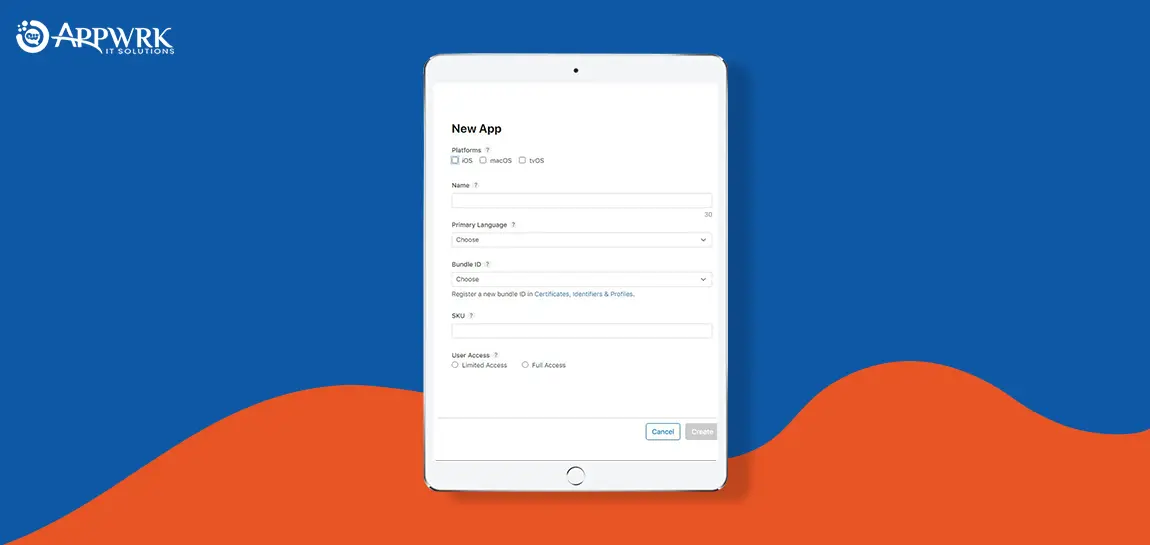
Select the platform for your app and fill in the required information in the respective sections. Once filled in successfully, click on Create. -
Select App Information from the sidebar and fill in the required details for both Localizable Information and General Information section.
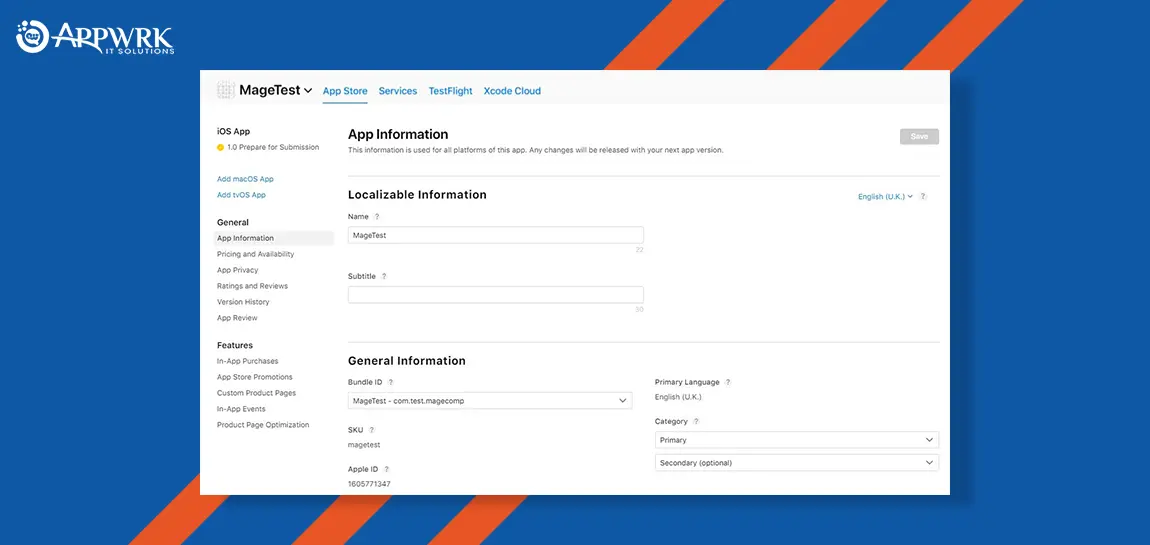
Select App Information from the sidebar and fill in the required details for both Localizable Informationand General Information section.
Define Content Rights for your app by checking the desired circle and hit Done.
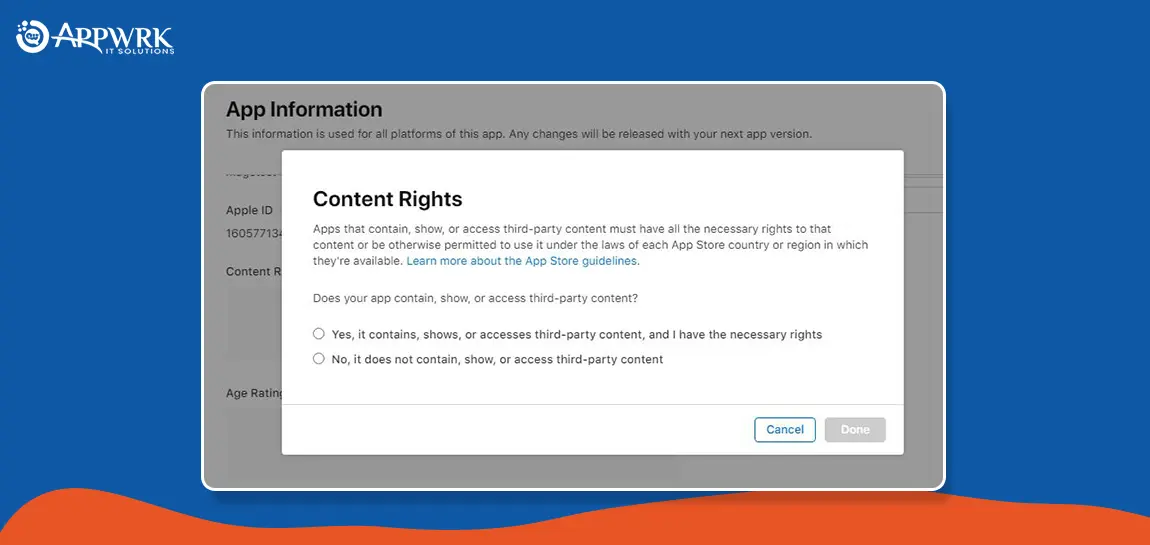
Define Content Rights for your app by checking the desired circle and hit Done
Specify Age Rating by checking the desired circle and hit Next.
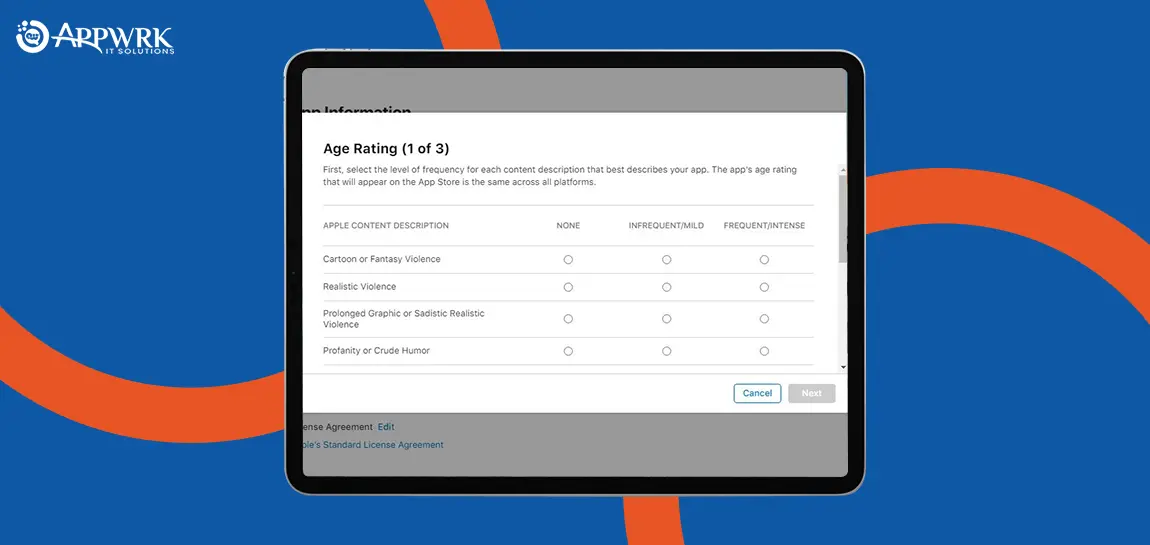
Specify Age Rating by checking the desired circle and hit Next -
Once content rights are saved successfully, select Pricing and Availability from the sidebar and define the pricing and other required details for your app. Once done, click the Save button on the top right corner.
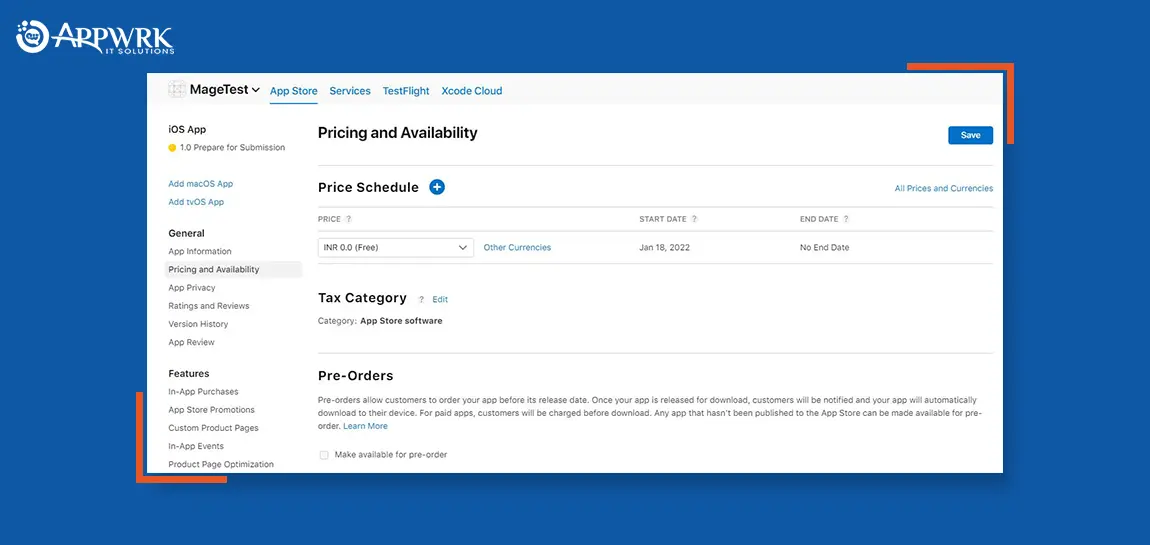
select Pricing and Availability from the sidebar and define the pricing as well as other required details for your app -
Next is App Privacy where you are required to enter your privacy policy URL.
Note: Users can use an online privacy policy generator for help.
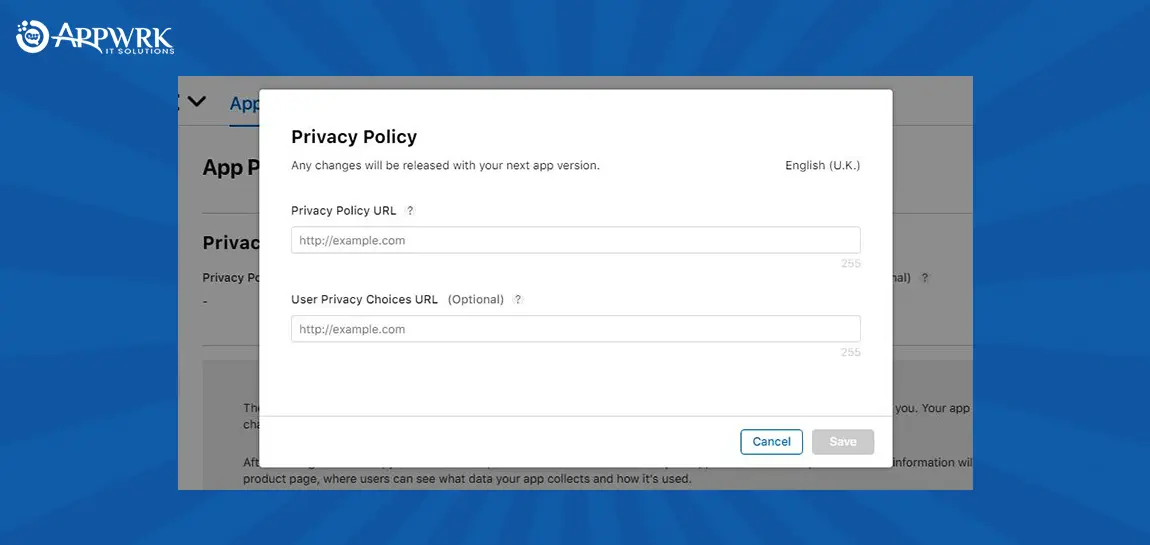
Next is App Privacy, where you are required to enter your privacy policy URL -
Select 1.0 Prepare for Submission from the sidebar. Scroll down for the Version Release section and select how your app will be released after passing the certification process.
You will be provided with three options:
Manually: Directly go to the App Store Connect to release your app.
Automatically: Release the app immediately after passing certification.
Specific Date: Schedule a particular date to release your app.
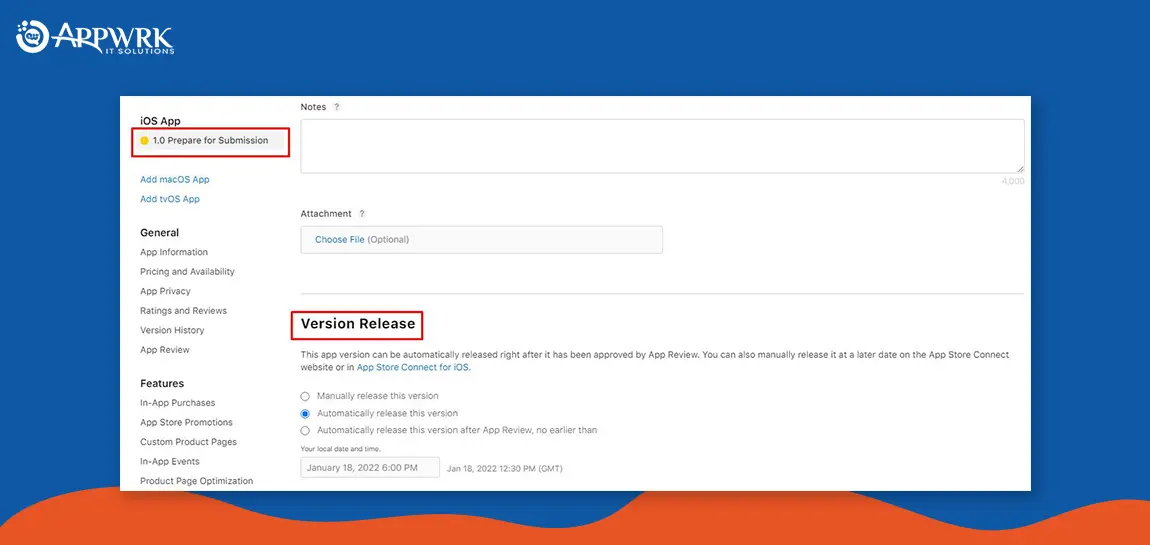
Select 1.0 Prepare for Submission from the sidebar
Upload App Store Screenshots and Previews for Your App
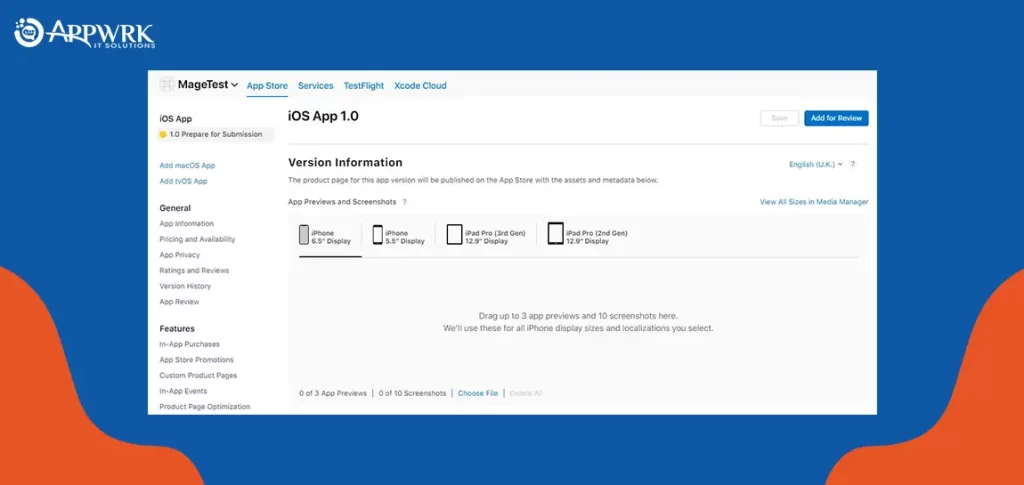
The next step to submitting an app to the app store is to add screenshots and Previews. The App Store provides an option for visual mobile app marketing by letting you add screenshots and previews of your app. Screenshots (images) and Previews (Short Videos) illustrate the functionality of your app.
Note: Users must abide by the specifications for both Screenshots and Previews. The App Store permits screenshots and previews separately for four different screen sizes. Users can add up to 10 screenshots and three app previews for each display.
Uploading Using Xcode
Once the screenshots and previews are uploaded successfully, it’s time to submit an app to the app store.
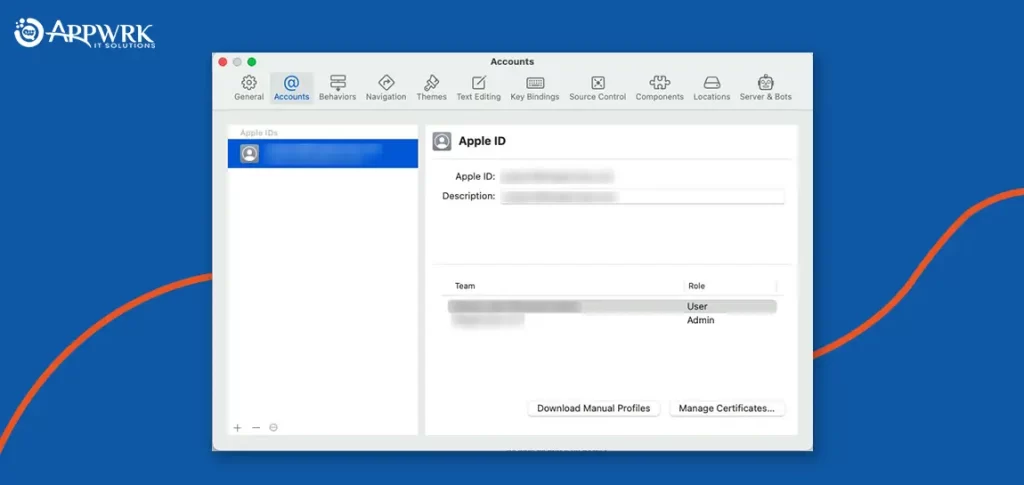
Step 1: Add your developer account to the Xcode.
Xcode > Preferences > Accounts.
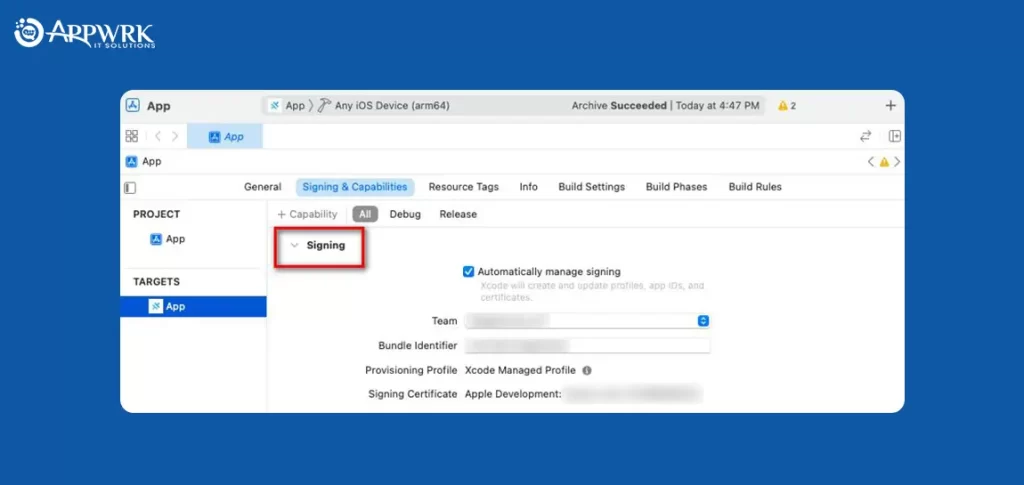
Step 2: Select Signing & Capabilities from the available options and check the Automatically manage signing checkbox for code signing.
Step 3: For publishing your app, select Any iOS Device from the list of simulators.
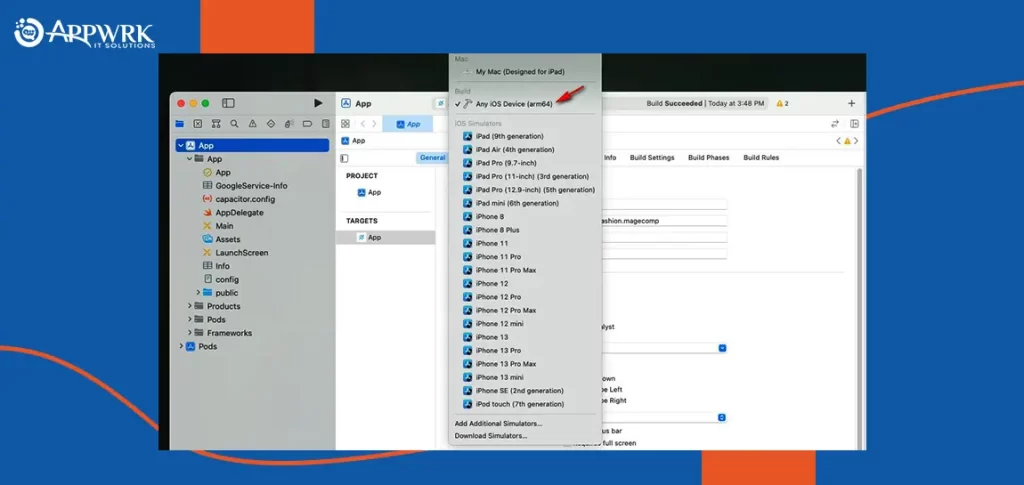
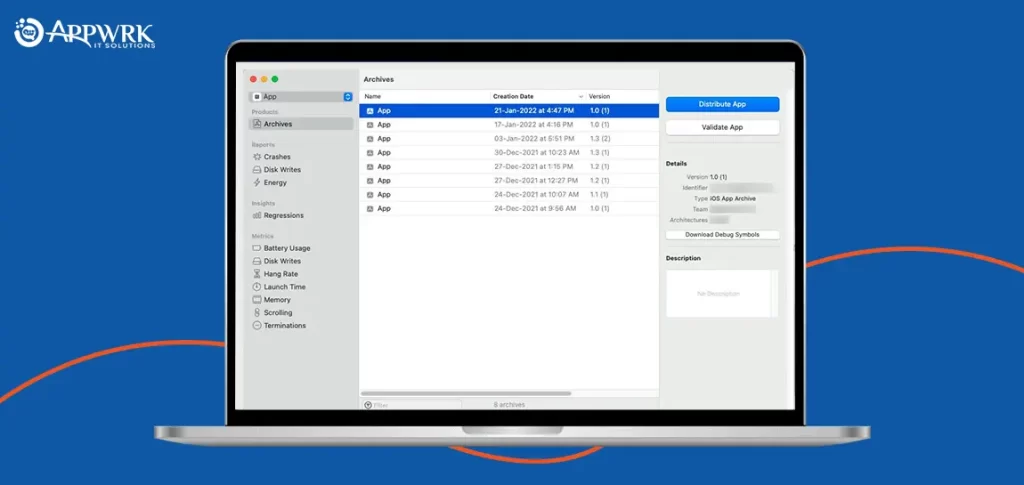
Go to the Product followed by Archive to bundle your app. This process will consume some time as per the size of your app. Once done, select the Archive and hit the Distribute App button on the top right.
Note: Users can manage all archives that have been generated.
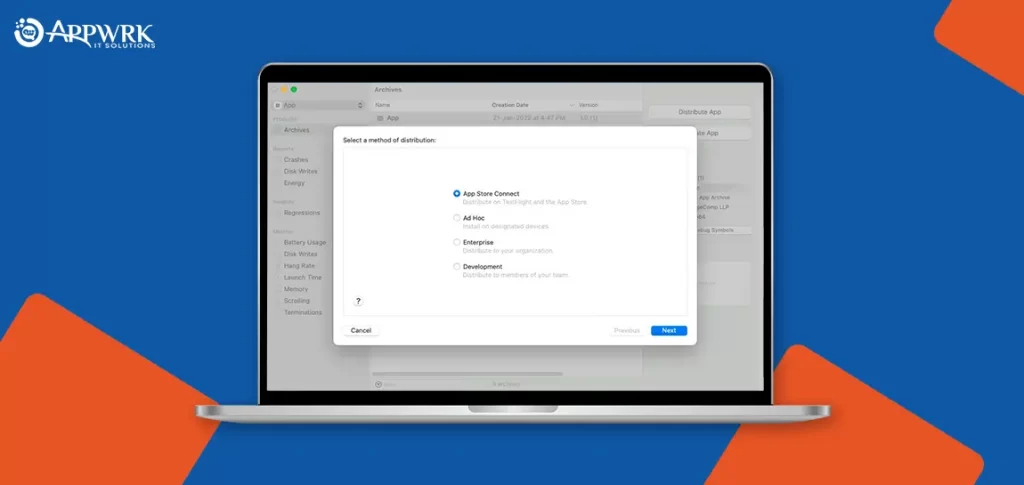
Select the method for distributing your app and click on Next.
Select the destination method for your app from the given options and click on Next.
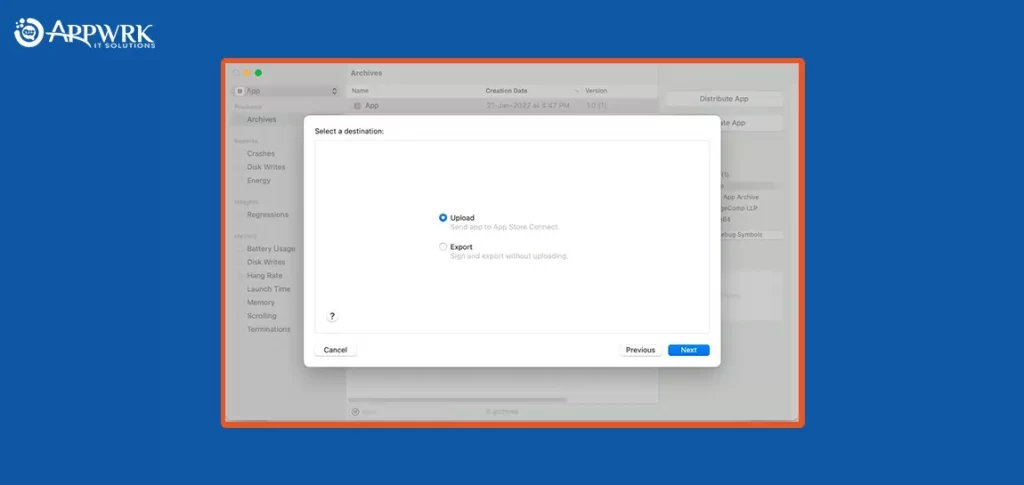
Now your app will be scanned for issues. If no problem is found, the process of uploading will begin. The uploading time will depend upon the archive size and network strength.
Note: The app archived to Xcode will take some time to process by App Store Connect.
Submit the iOS App for Final Review
This is the final step to submit an app to the app store, where your app will be published to the App Store.
Once the Save button is clicked, the app will be submitted for the final review, which can take a few hours to days. If you have been thinking of “how do i upload an app to the app store”, then by following the above steps, you will have submitted your app to App store. Once the app is approved, you will get the confirmation via email.
Finally, your app is ready to download from the App Store. The App Store Connect allows you to keep an eye on total downloads, sales, ratings, and much more.
Final Words
Now that you have successfully submitted an app to the app store, you can share your experience in the comments below. You can also share this blog with your known ones so that they don’t have to face any difficulty submitting the app to the app store in the future. On top of that, if you are facing an issue, feel free to contact mobile app experts at APPWRK. We will try to resolve the issue as early as possible.
Frequently Asked Questions (FAQs)
Q: How to publish ios app to app store that has been rejected previously?
A: Publishing an iOS app to the App Store after it has been rejected requires carefully addressing the reasons for rejection outlined by Apple. Start by reviewing the rejection notice in the App Store Connect, as it provides specific details on why the app did not meet Apple’s guidelines. Once you understand the issue, make the necessary changes to your app, which may involve fixing bugs, improving user experience, adhering to content policies, or ensuring compliance with technical requirements. After implementing the changes, thoroughly test the app to verify that it aligns with Apple’s standards and resubmit the app along with a detailed note to the App Review team explaining the updates and how they address the previous concerns.
Q: What are the technical requirements to submit the app to App Store?
A: Your application should be built and archived using Xcode and must be compatible with the latest iOS versions. Along with that, your application must be signed with an appropriate provisioning profile and distributing certificate to confirm that it is developed by a legitimate developer. Finally, before submitting your app, you should ensure that your app’s version number and build number are set correctly in the Xcode project settings and that you are declaring your app’s privacy permissions and adhering to privacy regulations.
About The Author




 Free Quote


