How To Have An Appealing Webflow E-commerce Website?
With the advent of the internet, more and more businesses have started selling products online. Besides, an E-commerce site enables you to reach new consumers online that you couldn’t reach with only brick-and-mortar sales. Not only will an E-commerce website help your business to grow more quickly, but it will also help you to increase your profit margins by ensuring that you save more money on different aspects of your advertising. However, building an E-commerce website can be a daunting task. Although there are many platforms for creating E-commerce websites, the Webflow E-commerce store is widely regarded as the premier site-builder tool. Webflow is a visual content management system for web designers who want to create and customize websites with ease.
Creating an E-commerce website can be challenging. Although Webflow E-commerce offers you effortless navigation, a Webflow Design Agency can guide you through the process of creating an E-commerce website flawlessly on Webflow.
Table of contents
- Webflow – A Dynamic Cloud-Based CMS
- Setting up an Ecommerce Template in Webflow
- Designing and Editing an Ecommerce Store in Webflow
- Add Products Categories and Discounts in Webflow
- Customize Product and Category Templates in Webflow
- Customize Checkout and Order Confirmation Pages in Webflow
- Set up Ecommerce Emails and Launch Your Webflow Store
- Conclusion
Webflow – A Dynamic Cloud-Based CMS
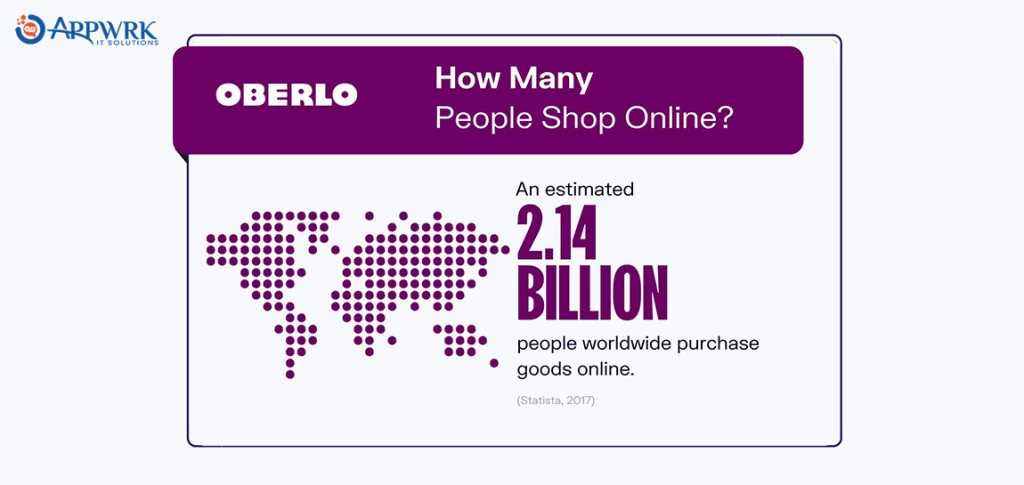
The number of online shoppers in the last 3 years has increased drastically. The statistical data shows that there are 2.14 billion people worldwide who love to shop online. Hence, it has become necessary to have an E-commerce website.
You can also take up your store online and increase your profits. You don’t have much technical knowledge, time, or investment. We will make it easy for you. Below are the steps to developing an E-commerce website in Webflow.
Let’s begin.
Table of contents
- Webflow – A Dynamic Cloud-Based CMS
- Setting up an Ecommerce Template in Webflow
- Designing and Editing an Ecommerce Store in Webflow
- Add Products Categories and Discounts in Webflow
- Customize Product and Category Templates in Webflow
- Customize Checkout and Order Confirmation Pages in Webflow
- Set up Ecommerce Emails and Launch Your Webflow Store
- Conclusion
Setting up an Ecommerce Template in Webflow
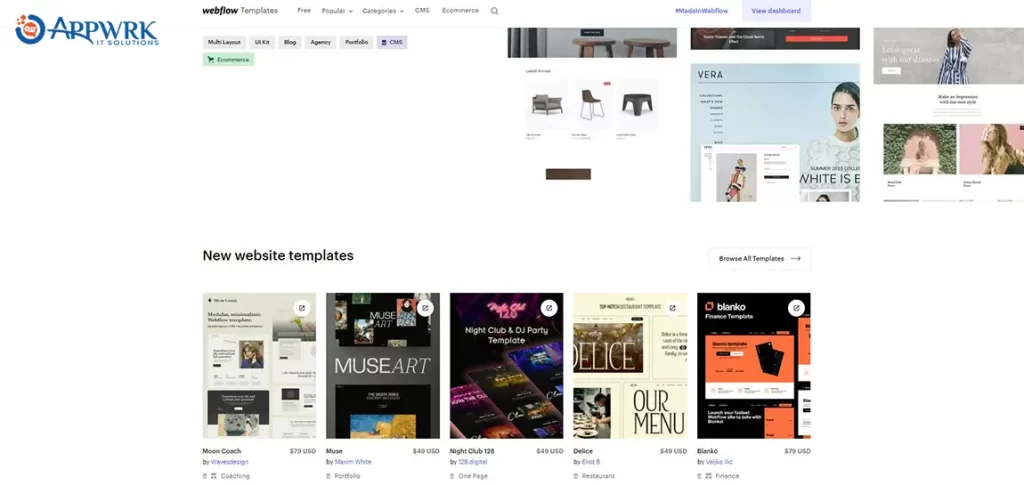
The first and foremost step is to choose a template. While selecting a template, think about customer navigation, the style of the homepage, and customization options. Whether you need a grocery store or a garment store, with Webflow, you can build your online store using a tonne of pre-made designs. You can choose from over 1,000 free and premium responsive website templates and dive deeper into the process of developing an E-commerce store.
You can choose a template provided by Webflow or go with a blank layout. You must activate the E-commerce button if you opt for the second option. This button offers several E-commerce features to create a more attractive online store.
Once you select a template, it will be automatically added to your dashboard. You can start with the Webflow designer and the editor to make your online store.
Designing and Editing an Ecommerce Store in Webflow
Once you have selected your template, you can customize the page with multiple customization options. With Webflow, you have the freedom to add your font styles, different background color schemes, attractive themes, etc. You can add elements such as a shopping cart or a price range tag that you want to display on your online store. For a free template, the page limits to 2 pages only. After that, you will have to upgrade and buy a plan.
It doesn’t matter if you are a pro at designing; you can quickly build your store. Webflow offers multiple controls and elements that you can add to your E-commerce store. You can highlight specific product details, add product images, or any other important information in a way that appeals to you.
The whole process may be a cakewalk for you if you are a Webflow developer or a designer. For an experienced designer, Webflow is a chance to utilize the skills properly and stand out from the crowd. You can make your Webflow website look even more attractive by adding an extra set of your skills and thus, creating a shopping experience that is compatible with the rest of the website.
Add Products Categories and Discounts in Webflow
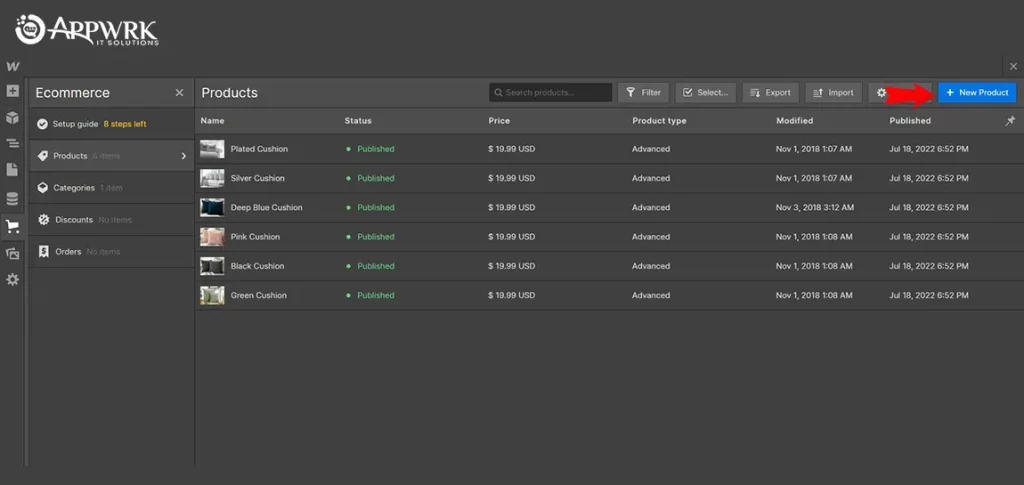
Product pages are essential pages on your website because they display what you sell. Once you have designed your online store, two collections will be automatically created, namely products and Categories. The E-commerce panel on the left sidebar will allow you to access these E-commerce collections, where you can edit the settings to customize your online store. Here, you can manually add products to your online store along with variants and categorize them as per your requirements. You can add attractive images and product descriptions to attract customers.
Customize Product and Category Templates in Webflow
Webflow allows you to edit or delete a product description or the whole category altogether. It also allows you to add new products. To add new products, you must click the Add product button on the right side of the E-commerce panel. After adding the products, you can add many features like filtering the collection per its type, listing the product type, editing the visibility, etc.
Remember that the product description for each new addition to the catalog must be concise and brief so the buyer can understand it easily. Since website visitors are attracted to the visual representation of the product, make sure to add high-quality product images. To avoid any misalignment of the gallery, add the exact size of the image as the original photo.
With these new additions, you can create categories such as books, clothing, electronics, etc. Use these categories to add product filters, such as price range, color, brand, etc., to let the customer easily navigate the website. This will help the customers find what they are looking for effortlessly.
Customize Checkout and Order Confirmation Pages in Webflow
A beautifully designed online store may attract people to visit the website. But it will not make an honest customer base if the checkout page is not equally impressive. A hassle-free checkout page is hardly abandoned by the customers. The checkout page contains a checkout form, order items, order summary, discounts, and additional information as the categories to be customized for your online store. After configuring the product and category pages, you can customize the checkout page by adding styling elements. You could also add a ‘continue shopping button to your checkout page.
A suitable payment method is essential for every online store. Keep in mind a few things before deciding on the payment gateway. Make sure to include a trusted payment method, or else the customer may discard the shopping and leave the website. In Webflow, you can use payment redirect methods like Gpay, PhonePe, etc., as payment gateways. You can also go for off-site payment, where the payment happens at the customers’ site.
Once the order is confirmed after a successful payment, your shipping procedure must also be aligned right after. Choose your shipping settings wisely. You can either go for free shipping or add extra charges for shipping, keeping in mind if the order is international or national. You can also decide whether you are drop shipping or packing the order.
Set up Ecommerce Emails and Launch Your Webflow Store
Learning to alter the settings of your online store’s email is essential. This will let you control who can receive notifications regarding new orders. Either the owner can directly receive the emails of the new orders, or they can assign them to any other team member. After setting up the email, take benefit from the customization options available in Webflow to make your email space look fascinating. You can change the look of your E-commerce emails by choosing the template of your choice. After that, you can upload the brand logo, change the color, customize the labels, use dynamic fields, etc., for your E-commerce email setup.
Let us now launch the store. A successful launch depends on the flawless working of your website. A single bug can disrupt the entire process. So, make sure that before launching your site, you test the website. This will help you avoid grave mistakes and keep you safe from making blunders.
Once the test run is done, open Project Settings and clicks on Hosting to launch the website. The website will host if you have a site plan; otherwise, you have to purchase a Webflow plan. Once the website is live, you should be able to add products to your cart and go to the checkout page quickly.
Conclusion
Gone are days when you had to wait to open your shop as per the specified hours. An E-commerce website solves the problem for you. You can stay in touch with your customers 24/7 now. Hence, a unique E-commerce website becomes the identity of your brand. This is the place where you can strengthen your customer bond and make some valuable customer relations. It is necessary to choose the right E-commerce platform. One must also have the right marketing strategy for the initial stage of launching an online store. With Webflow, E-commerce website building becomes easy because of its capability to provide multiple features to create an online store. Are you looking forward to making an online presence for your physical store? APPWRK IT Solutions is here to help you walk through the entire process effortlessly.
APPWRK IT Solutions is dedicated to providing an effortless journey to every customer. We have been serving different brands worldwide by creating various E-commerce websites for a long time. You can choose what alterations you want to make and will do it in a quick time. Our dedicated team can update your existing websites also.
It’s time to beat the competition in the market with the most impressive E-commerce store. All you need is an excellent Webflow E-commerce website. We assure you that it is necessary to have an online presence for people to reach you, and in return, you can make monetary benefits from your skills. Get in touch with us today. Hire Webflow Developer From APPWRK and start building a successful online store today!
Related Links:
About The Author





 Free Quote


